Distressed Trucker Hats: The Custom Merch Playbook
You're staring at a cap spec in a group chat, the launch date is already set, and the only thing the team agrees on is that the hat can't look like generic promo merch. That's usually where distressed trucker hats enter the conversation, because they hit the sweet spot between worn-in, collectible, and easy to wear with almost any streetwear or team uniform. They also carry real product history, from 1960s and 1970s U.S. promotional giveaways to the early-2000s fashion wave that turned the silhouette into a mainstream canvas for branding and retro styling, especially after the Von Dutch boom in 2003, when the brand was reportedly generating more than $33 million annually in that moment of peak demand trucker hat history, Von Dutch commercial peak.
What most buyers miss is that the distressed look isn't a vibe layer you can slap on at the end. It's a production decision set, from blank selection to decoration order to finishing intensity, and each choice changes whether the cap reads as premium or just beat-up. The mesh-back, structured front, and snapback closure still do the functional work underneath the weathered surface, which is why this category keeps showing up in team drops, creator merch, and event kits truckers as utility caps.
Table of Contents
Why Custom Distressed Trucker Hats Keep Showing Up in Team Drops
A launch lead wants something people will wear, the designer wants a cap that reads clearly on camera, and the merch buyer wants a piece that does not feel like leftover swag. Distressed trucker hats solve that brief because the silhouette already carries cultural memory. A worn brim, frayed edges, or faded panels reads as an intentional production choice, not a shortcut.
The silhouette already does half the work
The trucker hat began as a practical promotional cap, handed out in the United States as a low-cost mobile ad for feed stores and agricultural suppliers trucker hat history. That origin matters because the cap was built around function first, with a foam front for logos, mesh back for breathability, and snapback closure that made it useful in hot weather. When a style has that kind of utility DNA, distressing sits naturally on top of it.
By the early 2000s, the silhouette had already moved into mainstream fashion among suburban American youth connected to hip-hop, pop punk, and skater culture. That shift created the exact context where distressed finishes later made sense as a retro signal. You are working inside a cap format that has been culturally legible for decades.
Practical rule: if the base cap does not feel right on its own, distressing will not fix it. It will just make a weak blank look more expensive to ruin.
For founders and event leads, that is why the category keeps showing up in team drops. It lands as fashion, but it still behaves like merch. The production details have to be right so the final piece feels worn-in by design, not damaged by accident.
Choosing the Right Blank Before You Touch Any Sandpaper
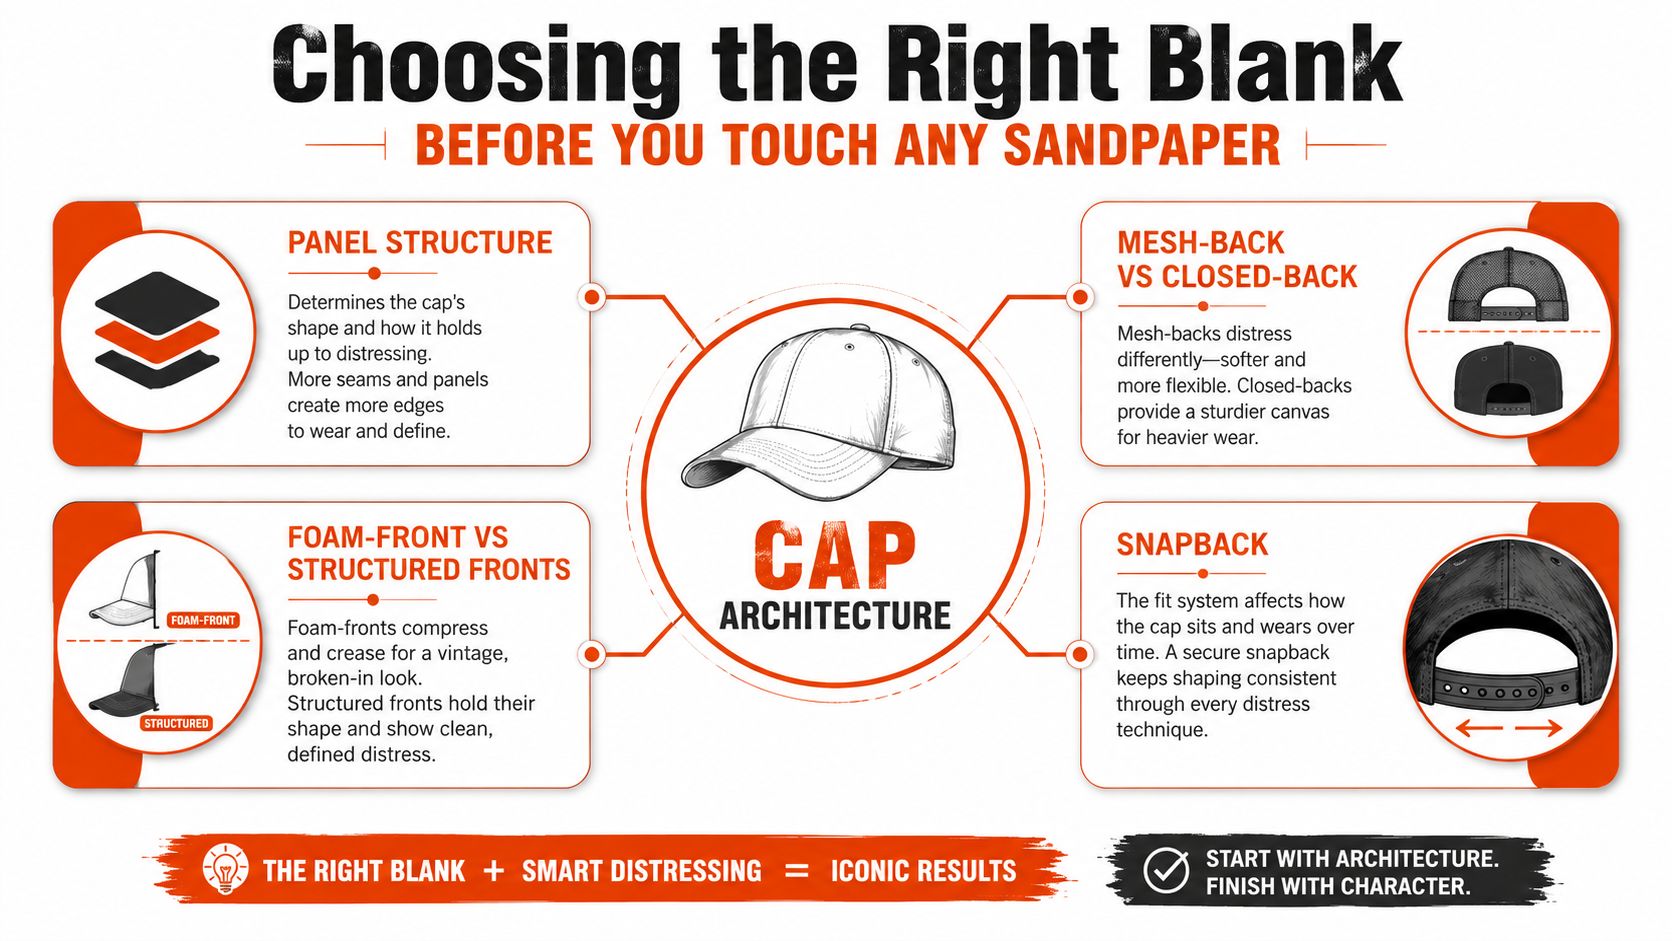
A distressed cap only reads well if the blank already has the right bones. If the crown collapses, the mesh feels cheap, or the front panel fights the decoration, sanding just makes the problems louder. Start with structure, then decide how much wear the cap should carry.
Build from the cap architecture up
A trucker cap normally uses a structured or foam front, mesh at the back, and an adjustable snapback closure cap construction guide. That layout is the reason the style works at all. The front panel carries the logo, the mesh keeps it breathable, and the closure keeps the fit flexible.
Blank choice changes how distressing will read later. Cotton and pigment-dyed surfaces usually take wear in a softer, more natural way, while synthetic-heavy fabrics can react differently to abrasion and fading. Mesh density matters too. A tighter mesh tends to hold shape better, while a looser one can look more obviously frayed after finishing.
Match the blank to the finish you want
A stable front panel gives you the safest surface for logo work, especially if the cap will be sanded or washed later. Mesh-back construction changes how the finished cap feels in hand, which matters when the brief calls for premium with wear, not a hat that looks beaten up by accident. If the crown starts out too soft, distressing can push the shape out of line.
Distressing amplifies whatever the blank already communicates, so blank selection has to come first. A reliable starting point is the core trucker format, then you layer in the amount of wear the drop needs. The wrong blank will not carry a good distressing spec.
Use the blank as the structural anchor. Distressing should reveal the cap's character, not expose weak construction.
Distressing Techniques and the Sequencing Rule That Saves Every Drop
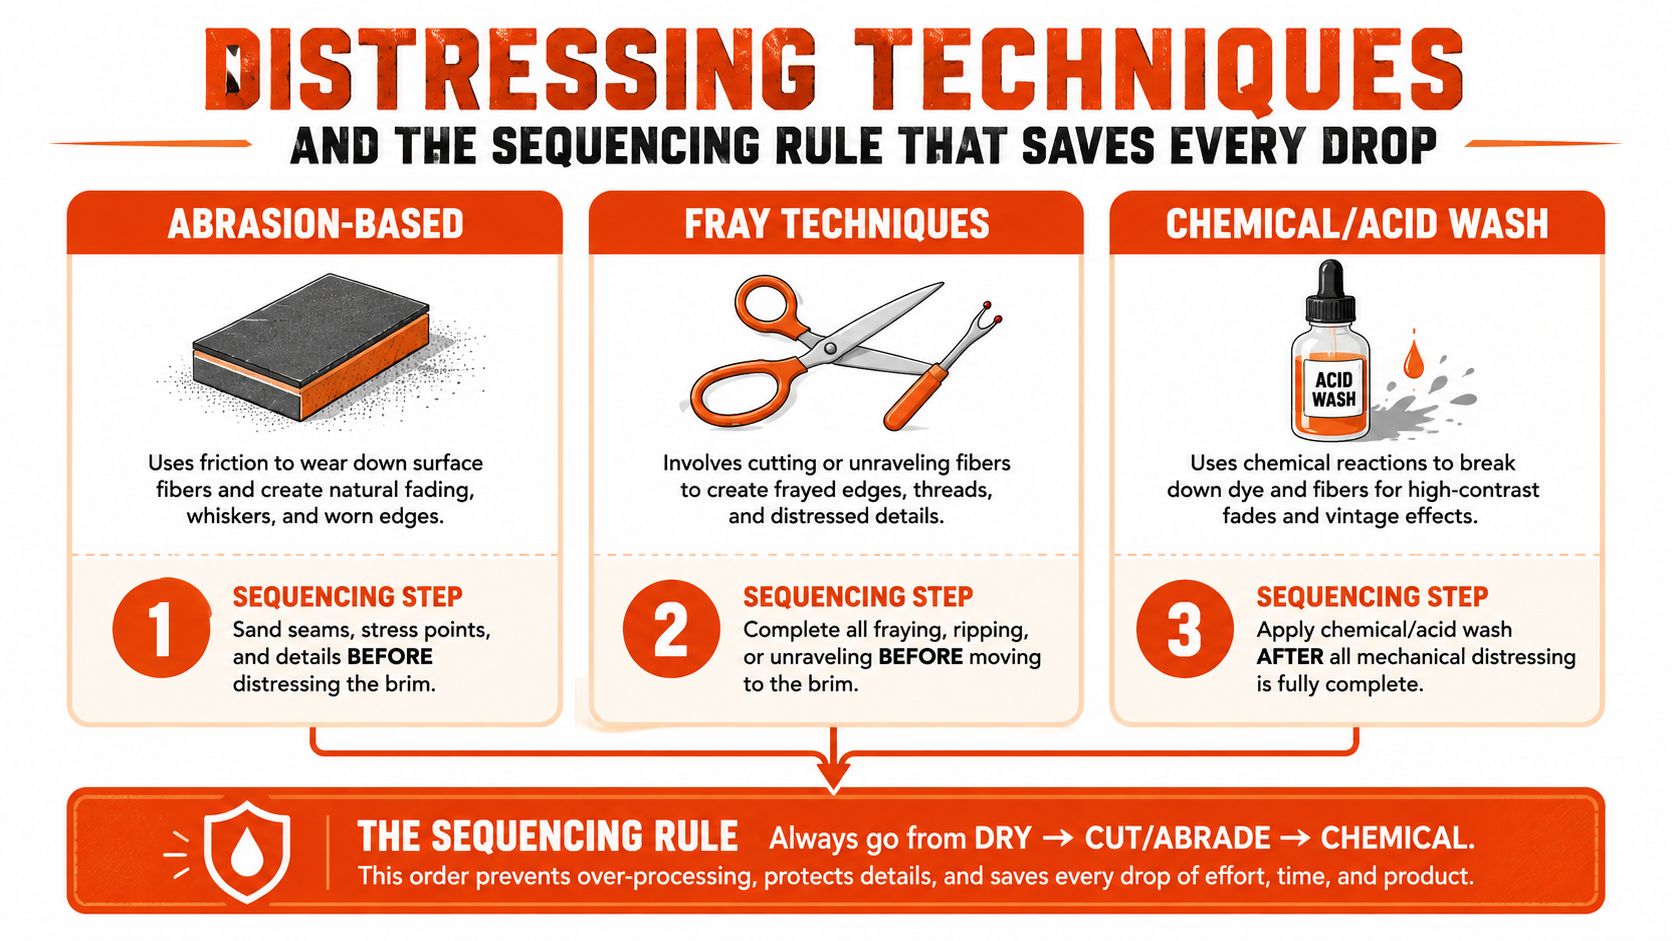
A distress job falls apart fast if you run abrasion after decoration. Embroidery threads get scuffed, patches can lift, and printed surfaces can crack or fade in ways that are hard to predict once the cap has already been finished. The production rule is straightforward, decorate first, distress second.
The three methods that show up in production
Abrasion-based finishing gives the most control. Fine-grit sanding on the brim and seams creates wear without breaking down the whole cap, so it is usually the cleanest way to land a softer vintage read. It works best when the goal is a worn-in cap with structure still intact.
Fray techniques use controlled snipping or seam-ripper work to open edges and seams. Done with restraint, that gives the hat a raw, authentic feel. Pushed too far, the structure starts to give up faster than the brief calls for, and the hat can turn into a production problem.
Wash and chemical finishing covers bleach fading, dye fading, and related aged effects. It can deliver a strong retro look, but it is also the easiest route to overshooting the effect. Guidance on bleach and wash guidance says bleach should be diluted, applied sparingly, and rinsed right away, because leftover bleach keeps reacting and can leave white spots or uneven fading if it is not neutralized quickly enough.
The factory needs a written spec, not a mood board
Distressing changes from unit to unit, so the process has to be defined before production starts. Lock in the sandpaper grit, the number of abrasion passes, the fade target, and the placement of wear on the cap. Approve a physical pre-production sample before the run moves ahead, because handcrafted abrasion and dye effects will never match perfectly across every piece.
The order of operations matters just as much. A multi-needle embroidery setup, such as a Tajima-style machine running around 1,200 stitches per minute, is built to place stitches efficiently before finishing begins manufacturing workflow. Distress after that stage, and the decoration stays protected instead of taking the damage first.
A good shop rule is simple. If the logo cannot survive a controlled wash or sand pass, it does not belong on that surface. The same planning discipline shows up across merch work, which is why production teams map the brief before ordering anything, not after the creative is done merch planning reference.
Sequencing beats aesthetics. A disciplined distressing spec protects the decoration, keeps the shape in line, and makes the cap read intentionally worn instead of randomly abused.
Customization Methods That Hold Up on Distressed Surfaces
A distressed cap surface gives you less room to hide mistakes than a clean blank. Texture changes registration, fading changes contrast, and raw edges change how a logo sits on the crown. The safest customization choice is the method that survives the cap's finish without fighting it.
| Method | Best For | Risk on Distressed Fabric |
|---|---|---|
| Flat embroidery | Stable front panels, clean logos, minimalist branding | Lowest risk, especially when the front panel stays structured |
| 3D embroidery | Bold wordmarks and raised logo treatments | Needs more reinforcement, can look clumsy on overly softened panels |
| Chenille | Vintage sports feel and tactile branding | Can overwhelm a small crown or clash with frayed edges |
| Patches | Woven, leather, or embroidered badge looks | Low surface conflict, since the patch sits on top |
| Screen printing | Simple art on smoother panels | Opacity drops on heavily pigment-dyed or textured surfaces |
| DTG | Fine detail on flatter surfaces | Less reliable on rough or uneven cap surfaces |
| DTF | Flexible graphics with more surface tolerance | Still needs a considered placement map on distressed areas |
What tends to work best
Flat embroidery on a stable front panel is the cleanest default. It keeps the logo readable and does not depend on the surface staying perfectly smooth. If the cap is heavily distressed, patches can be safer because they sit above the texture instead of sinking into it.
3D embroidery and chenille can work, but they need more care. Those methods add visual depth, which helps when the cap is meant to feel refined, but they can start looking bulky if the front panel is already soft or heavily treated. Screen printing needs the most honesty about the substrate, because pigment-dyed or weathered fabric can reduce opacity and make the print feel muddy.
Match the decoration to the distressing level
If the cap has only light brim wear, most decoration methods are still on the table. If the piece is meant to look heavily pre-worn, patches usually outperform direct print because they keep the mark readable across texture changes. That is also why many brands compare patch construction before they commit to a finish, and a closer look at custom embroidered patch construction helps when the logo needs to survive more abuse.
The decision point is surface compatibility. Texture affects registration, contrast, and perceived quality, so the customization method should be chosen with the distressing level already in mind. If the brand mark needs to stay crisp from a distance, choose the method that tolerates the wear you are asking the cap to carry.
MOQ, Pricing, and Production Timeline for a Real Drop
Most aesthetic writeups stop at the look. Real production starts where the spreadsheet does. You need a minimum, a timeline, and a clear sense of which variables move unit cost before you brief the team or announce the drop.
The numbers that shape the order
For apparel, the practical floor is usually around 10 units per order, while cut-and-sew work starts around 50 units MOQ and production model. That matters because a distressed trucker hat can sit in either lane depending on whether you are ordering a decorated blank or building something closer to a custom silhouette.
Direct factory pricing through French ateliers keeps margins saner than agency markup layers, especially when the order includes multiple finishing steps. The cost drivers are the blank, the decoration method, the distressing complexity, and the packaging spec. A simple cap with flat embroidery and light abrasion costs one amount; a fully customized run with patches, detailed finishing, and custom packaging is another.
The timeline you can plan around
A workable production flow starts with a 24-hour quote with product preview, then e-proof approval, then 10 to 15 business days for production and worldwide delivery production flow. Reorders of previously approved designs can move in 5 to 7 days. That is the difference between a one-off campaign and something you can build into your launch calendar.
For teams planning an event or drop, it helps to align the cap timeline with the rest of the launch stack. If you are mapping a live moment, a resource on how to plan a brand launch event can help the merch slot into the broader rollout without turning into a last-minute scramble.
Payments can be handled in stablecoin or fiat, which is useful when finance wants clean procurement and the operations team wants speed. Rush options exist, but they do not fix bad scoping. They only compress a brief that should have been approved earlier.
If the order has more customization layers, budget more time for proofing and sample approval. The hat may look simple, but finishing choices stack fast.
Packaging and Fulfillment for Events, Teams, and Multi-Address Drops
A distressed trucker hat can feel premium in the box or forgettable in a poly-mailer. Packaging changes the first impression, and fulfillment changes whether the drop feels smooth or chaotic. For teams, creators, and event leads, that logistics layer is part of the product.
Turn the cap into an unboxing moment
The usual upgrades are straightforward, mailer boxes, tissue paper, stickers, hang tags, embroidered name tags, and custom labels. Those details matter because distressed headwear already carries a tactile story, and the packaging should match the finish instead of flattening it. A clean label and thoughtful insert can make a cap feel like part of a drop, not an inventory item.
Multi-address shipping is a breakthrough for distributed teams, conference gifting, influencer sends, and community drops. One order can ship to many recipients, which means you don't need a separate logistics vendor just to split the inventory. That's a practical advantage when the same cap design has to reach employees, creators, and event partners in different cities.
Inventory storage in the EU and on-demand shipping in branded packaging also make DTC-style rollouts easier to manage. DDP shipping to the US, UK, Canada, Australia, Switzerland, and Norway reduces friction on the receiving side fulfillment and shipping options. For brands that want the cap to land ready to wear, packaging and routing are not afterthoughts, they're part of the brand experience.
Your Production Checklist From Blank to Delivered Drop
A supplier brief does more than keep a Slack thread under control. For distressed trucker hats to become a real drop, the order has to be set from blank selection through shipping before the first sample gets touched.
Keep this brief tight
- Blank Selection: Choose the cap body, mesh density, front structure, and closure before distressing is discussed.
- Panel and Closure Specs: Confirm whether the front needs reinforcement and whether the snapback fit works for your audience.
- Distressing Method and Sequencing: Lock the abrasion, fray, or wash method, then specify that decoration comes first.
- Customization Choice: Pick embroidery, patchwork, or print based on how much texture the final cap will carry.
- Pre-Production Sample: Approve one physical sample before the run starts so the factory has a real reference point.
Packaging, shipping regions, and multi-address routing belong in the brief too if the supplier is handling fulfillment. Vague briefs are what turn good ideas into unfinished orders. The best drops happen when the production details are unambiguous.
For teams, creators, and event leads, that clarity keeps the cap on schedule from spec sheet to outbound cartons. It also gives the factory a single reference point for what the final hat should be, instead of forcing them to interpret scattered comments after sampling has started.
Banger helps teams turn cap ideas into merch people keep wearing, with premium blanks, custom decoration, and production built for modern launches instead of generic swag. If you're planning distressed trucker hats for a team drop, event, or creator release, visit Banger and get a quote when you're ready to spec the blank, the finish, and the fulfillment.