The Embroidery Placement Guide for Modern Merch
You've probably seen it happen. The garment is good, the embroidery itself is clean, the thread color is right, and the piece still looks off. Not ruined. Just cheap in a way you can't unsee.
That usually comes down to placement.
A logo that sits a little too low on a heavyweight hoodie, too close to a placket on a polo, or awkwardly near a zipper on a jacket sends the wrong signal fast. People read that kind of thing instantly, even if they can't explain why. Premium merch feels intentional. Bad merch feels like someone dropped a logo onto a mockup and hoped production would sort it out.
That's why a real embroidery placement guide matters. Not as a beginner checklist, but as a quality control mindset. Placement decides whether branded apparel feels like part of a wardrobe or like conference leftovers. If you're investing in better blanks, better embroidery, and better finishing, this is one of the details that has to hold up.
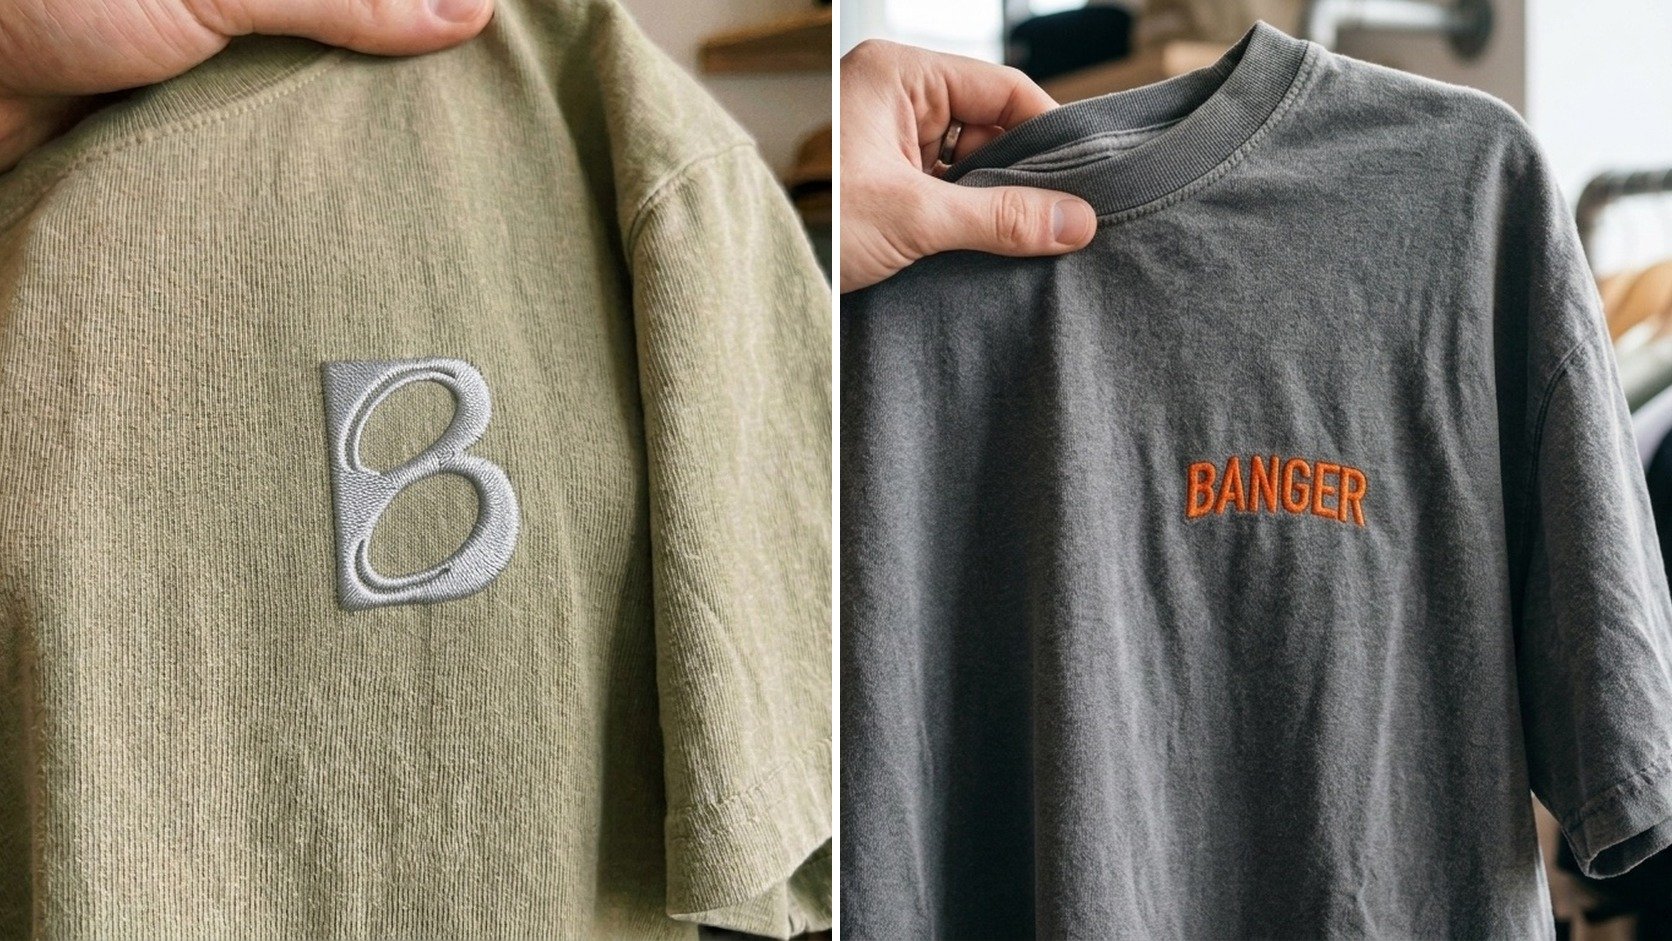
Here's a short sample of what we've done in embroidery at Banger. On the left, a tonal grey B sitting high on the left chest of a washed olive heavyweight tee, low contrast on purpose so it reads premium up close instead of loud across a room. On the right, an orange BANGER wordmark on a washed grey tee, same left-chest placement, sized to stay clean against the garment.
Table of Contents
Why Embroidery Placement Is Everything
Embroidery placement isn't a finishing detail. It's part of the design.
On premium merch, people judge the whole garment through a few fast signals. Fabric weight. Fit. Color. Placement. If one of those feels unresolved, the rest loses value. A clean satin stitch can't save a logo that's floating too far from the collar or getting swallowed by a chest panel.
Placement is a brand signal
Placement tells people whether the garment was considered. Good placement feels calm. It leaves enough space around the mark, respects the garment's construction, and lands where the eye expects it to land. Bad placement creates tension. The design can look crowded, low, tilted, or disconnected from the shape of the piece.
That's why the same logo can feel professional on one garment and amateur on another. The art didn't change. The relationship between the art and the garment did.
Practical rule: If the logo placement makes the garment feel like a blank with decoration added later, it's probably wrong. The best placements look native to the product.
A lot of teams get this wrong when they upgrade everything except the placement logic. They choose better heavyweight hoodies, better polos, better thread colors, then use a generic left-chest default across every cut. That's how expensive merch still ends up looking like a giveaway.
If you're still deciding whether embroidery is the right customization route in the first place, this breakdown of custom logo embroidery is a useful starting point.
Old rules break on modern fits
Classic placement rules still matter, but they were built around standard garment shapes. Modern merch often isn't standard. Fits are boxier, shorter, heavier, more structured, or more fashion-led than the average promo tee. That changes how a logo sits.
A left-chest mark that works on a regular polo can look oddly low on a cropped tee. A hoodie with a thick kangaroo pocket changes the available visual field on the front. A jacket zipper turns a centered design into a technical problem, not just an aesthetic one.
Here's the trade-off. Strict formulas give consistency, but blind formulas give bad outcomes. The job is to keep placement repeatable without making it mechanical.
What cheap merch gets wrong
Cheap merch usually misses one of three things:
It follows the wrong reference point instead of the actual garment structure.
It ignores the cut and uses one template for every size and silhouette.
It treats embroidery type and placement as separate decisions when they're connected.
That last one matters more than people think. A flat logo, a raised puff mark, and a chenille application don't occupy a garment the same way. If the placement doesn't account for that, the piece won't feel resolved.
The Unwritten Rules of Embroidery Placement
A logo can be digitized perfectly, stitched cleanly, and still make the garment look cheap. Placement does that. One inch too low on a cropped heavyweight tee, too close to a zipper on a quarter-zip, or too high on a structured hoodie, and the piece stops feeling considered.
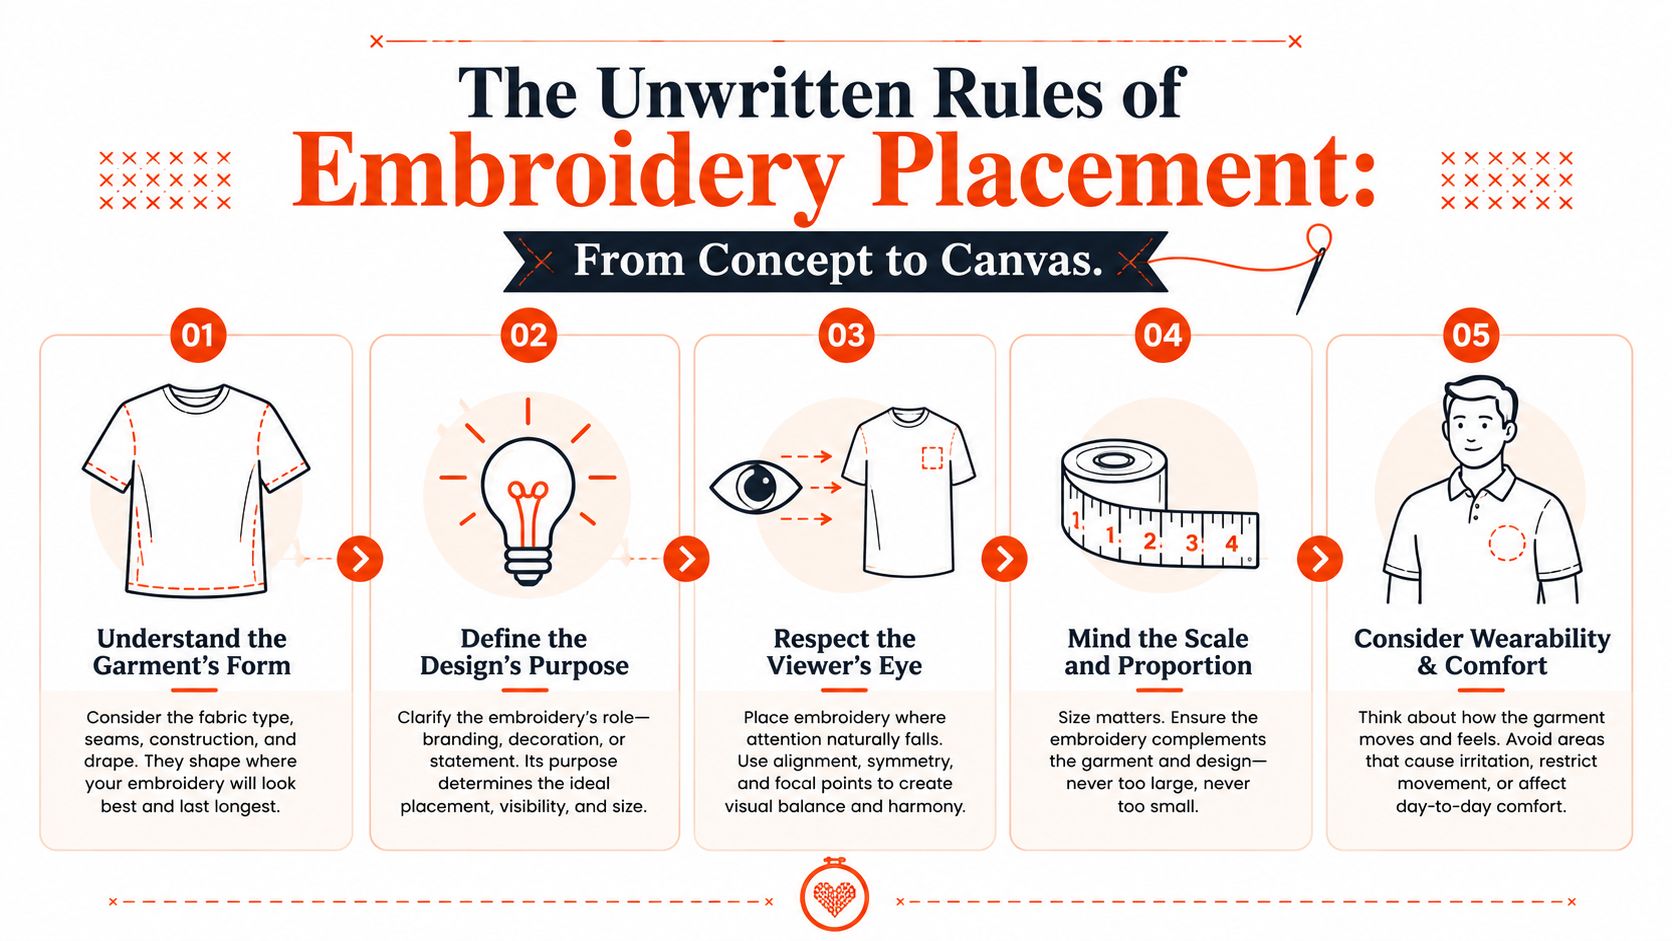
Use real garment landmarks
Good production teams measure from construction points that were sewn into the garment. Shoulder seam, neckline, center front, placket, pocket edge. Those references hold up better than a fold line from packaging or a crease made on the packing table.
That matters more on modern blanks. Boxy tees, drop shoulders, cropped bodies, mock necks, oversized hoodies, and zip fronts break old placement habits fast. A template that works on a standard polo can drift visually on a fashion fit, even if the tape measure says it is "correct."
The rule is simple. Measure from the garment's structure, not from how it arrived folded.
Build a centerline before you commit
Experienced operators mark center because cleanup is expensive and embroidery is unforgiving. Once needle holes are in the fabric, a bad position is hard to hide.
A reliable setup starts by matching the garment's true balance points, then building the design center from there. Fold shoulder to shoulder or align side seams where that makes more sense for the silhouette. Mark the vertical center. Add the horizontal line at the intended height. Then secure the piece so the stabilizer stays flat and the fabric does not torque in the hoop. Sulky's placement method walkthrough shows this process clearly.
Minimal logos expose every miss.
If a brand is approving multiple garment styles at once, placement decisions should be settled before art goes to the machine. This custom merch design FAQ is a useful checkpoint for what to lock before production.
Balance beats pure symmetry
Perfectly centered is not the same as visually right.
The eye reads spacing before it reads measurements. A mark can be mathematically centered and still feel crowded by a placket, swallowed by a hood, pushed off by a pocket, or dragged down by a heavy zipper line. Premium-looking embroidery usually has controlled negative space around it, and that spacing changes with garment architecture.
Use this order of operations:
Read the interruptions first. Pockets, plackets, zippers, seam breaks, drawcords, and yokes all change the safe field.
Judge visual weight, not just logo width. A dense fill stitch logo or blocky wordmark needs more breathing room than a thin monogram.
Check the garment on body, not only flat. Curved chests, cropped hems, and oversized fits shift how placement reads once worn.
Protect function. If embroidery fights the pocket, zipper, or stretch zone, the garment will feel poorly made no matter how clean the stitching is.
Match placement to the embroidery type
This is one of the mistakes standard guides skip. Flat embroidery, 3D puff, and chenille do not occupy space the same way, so they should not be placed with the same level of aggression.
Flat embroidery can sit in tighter, cleaner zones because it stays close to the fabric. Puff needs more clearance because the raised profile catches light and reads larger on the body. Chenille carries even more visual mass and usually performs better where the garment has room to frame it. Treating all three the same is how merch ends up feeling like a generic promo piece instead of a branded product.
The unwritten rule is to place for the finished effect, not the digitized file.
Garment by Garment Placement Playbook
A logo can be digitized perfectly and still look cheap once it hits the wrong garment. That usually happens in sampling. The file is fine, but the placement ignores collar depth, pocket mass, panel seams, or the way a modern oversized fit sits on body.
That is why generic left-chest advice falls short. A premium tee, a structured polo, a heavyweight hoodie, and a six-panel cap all frame embroidery differently. Placement is part of the design language, and the right choice makes the brand feel considered instead of promotional.
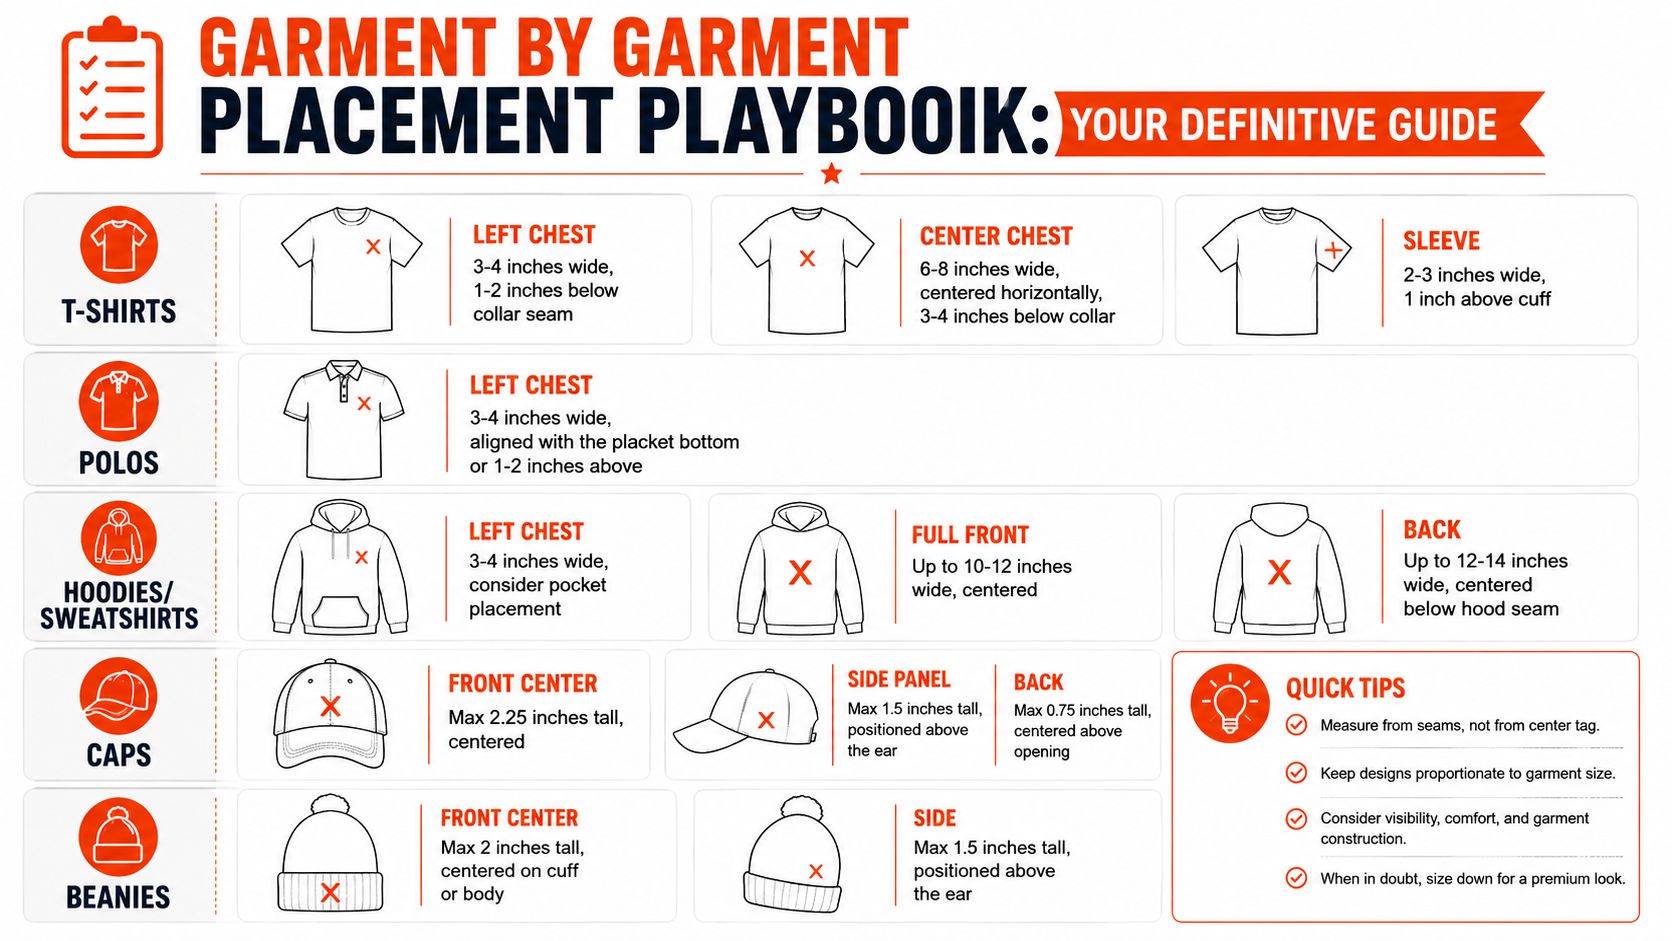
T-shirts
T-shirts give you less structure and less forgiveness. Jersey drapes, necklines vary more than spec sheets suggest, and a logo that looked balanced on a flat table can drop low once the shirt is worn.
Left chest still works well on tees, but only when the art suits the garment. Small wordmarks, monograms, initials, and compact icons usually hold up. Wide logos are where teams get into trouble. They technically fit, but they start reading too close to the armhole or too far toward center, which makes the whole front feel off.
Three rules keep tees looking intentional:
Keep the mark modest. Soft jersey exposes overbuilt embroidery fast.
Use center chest only when the artwork can hold that real estate cleanly.
Watch tension on lightweight bodies. Dense stitching can make the fabric pucker and telegraph cheap production.
Garment choice affects placement more than many brand teams expect. A cropped tee, a tubular blank, and a dense heavyweight tee all carry embroidery differently. If you are comparing silhouettes before development, these hoodie blanks are a useful reference for how construction shifts decoration decisions across categories.
Polos
Polos need sharper judgment. The placket creates a vertical anchor, the collar adds structure, and the wrong placement makes the front look crowded in a way a tee can sometimes hide.
A good polo logo sits with the placket, not against it. The embroidery should feel anchored to the chest panel and clear of the button line. On performance polos with more drape, I leave a little more breathing room because the fabric moves and the logo can start to feel pinned on if it sits too tight. On structured pique or mercerized cotton, placement can be slightly cleaner and more assertive.
Flat embroidery usually wins here. Fine detail reads better, and the cleaner surface matches the formality of the garment. Puff and chenille can work on fashion polos, but they need a deliberate concept behind them or they look like the decoration and the garment came from two different briefs.
Hoodies and sweatshirts
Standard placement charts break down fastest because hoodies bring in hood bulk, drawcords, center seams, zipper lines, and often a kangaroo pocket. Sweatshirts are simpler, but the heavier face and rib proportions still change how the front panel reads.
Left chest is still the safe premium move for many hoodies, especially when the goal is brand presence without making the piece feel like event merch. Center chest works best with simple art and enough scale to stand up to the hood opening. On a boxy heavyweight fleece, the garment can support bolder placement because the body has more visual weight. On a lighter hoodie, the same logo often feels overcommitted.
Here is the fast read:
| Garment | Placement that usually works best | What often fails |
|---|---|---|
| Heavyweight hoodie | Left chest or clean center chest | Tiny logo lost under a large hood opening |
| Lightweight hoodie | Small restrained embroidery | Dense embroidery that puckers the face fabric |
| Crewneck sweatshirt | Left chest, center chest, sleeve accent | Placement too low on smaller sizes |
For development, I prefer checking these on a form or on body before approving bulk. Flat measurements help, but they do not show how the hood pulls the neckline or how the pocket changes the visual center. That is where choosing your dress form becomes useful during fit review and decoration signoff.
A quick visual reference helps if you want to compare common placements in motion and on finished garments.
Caps
Caps are less about standard placement and more about respecting the build. Front panels curve, center seams interrupt artwork, crown height changes available space, and the bill affects how the logo is seen from normal viewing angles.
The best front cap embroidery is bold, simplified, and built for the panel shape. Tall artwork often crashes into the crown line. Fine detail gets lost. Overly wide logos can buckle visually around the curve even if the machine runs them cleanly. That is why 3D puff usually performs best with simple shapes and thick letterforms, while flat embroidery gives you more freedom for cleaner branding.
Side embroidery works well for secondary marks, especially on premium headwear where the front logo already has enough presence.
Beanies
Beanies look easy and sew hard. Stretch, rib texture, and cuff depth all affect the final result, and small type almost always suffers.
A front cuff logo works when the art is compact and bold. Side placement can look more fashion-driven, especially for creator merch, streetwear capsules, and brands that want the piece to feel like product first, promotion second. Chenille patches and thicker embroidery styles can also work well here because the cuff gives them a contained frame.
The test is simple. If the artwork cannot stay clear through rib texture and stretch, it does not belong on a beanie.
Advanced Placement for Different Sizes and Shapes
A logo can look perfect on the approval sample and wrong the moment it lands on a different cut. That is usually not a digitizing problem. It is a placement decision made on one body, one size, and one silhouette, then forced across the whole run.
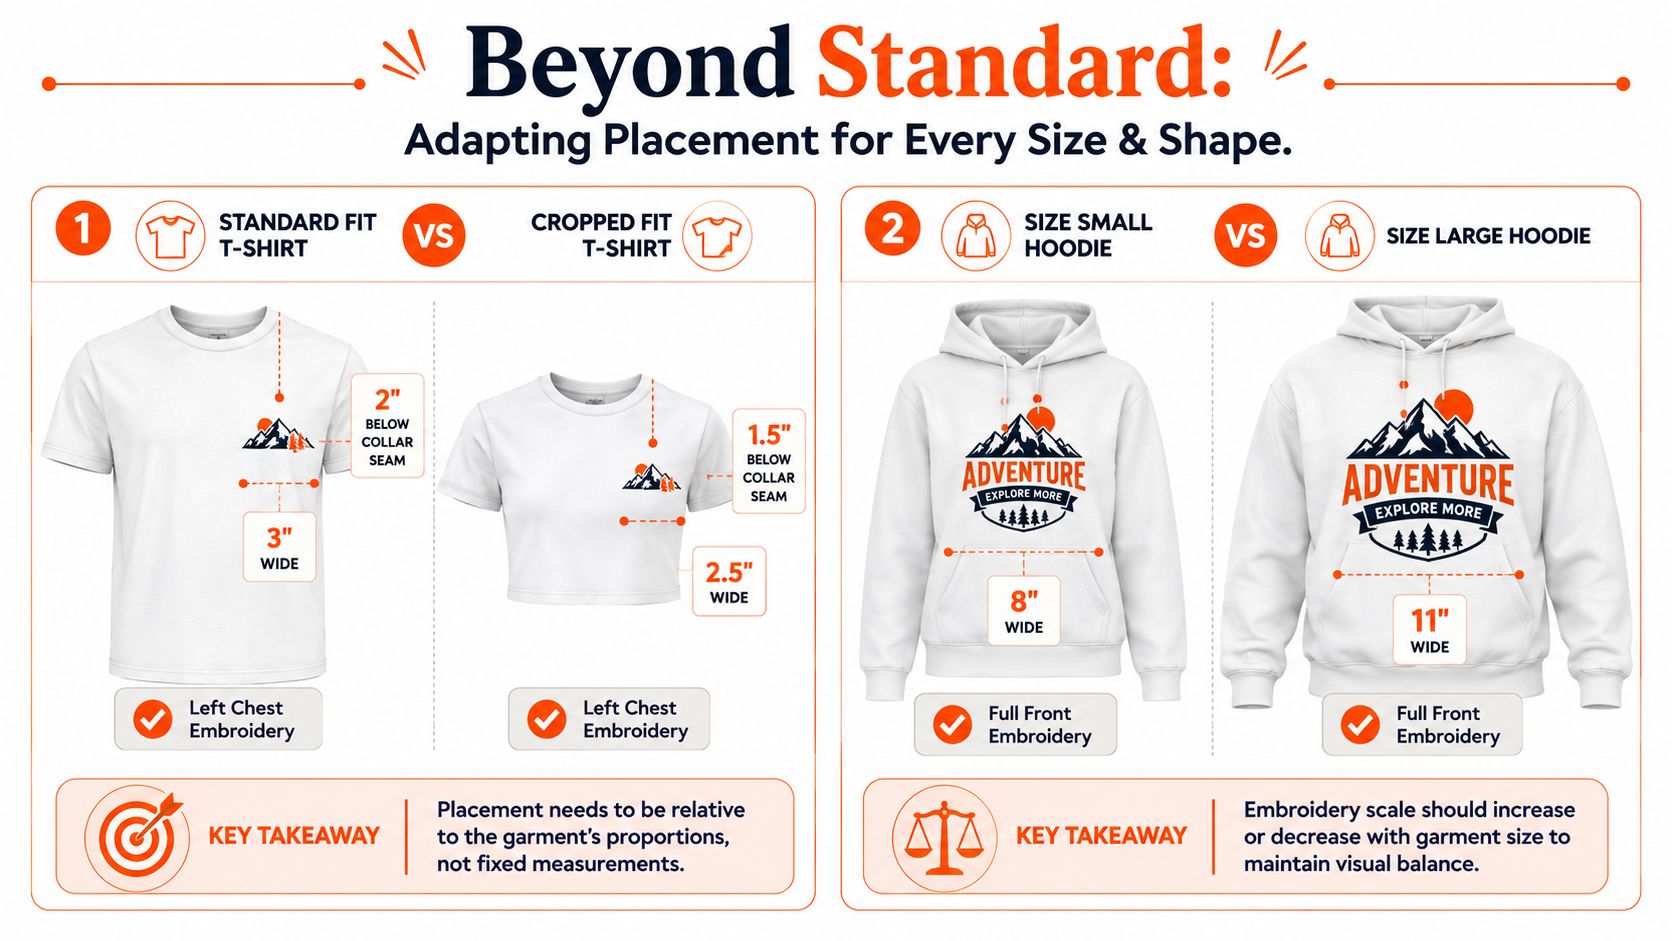
Premium embroidery reads as intentional because the mark stays in proportion to the garment, not because someone followed a generic left chest chart. Modern blanks make that harder. Cropped bodies, dropped shoulders, boxy fits, youth sizing, and fashion-forward women's cuts all shift where the chest appears once the piece is worn.
Small sizes and youth garments need different math
Smaller garments need a shorter drop and a more disciplined logo scale. A placement that feels balanced on an adult medium will often sit too low on youth apparel and too wide on toddler or small youth sizes. The result is easy to spot. The logo starts drifting toward mid-torso, and the piece stops looking premium.
The fix is simple in principle and easy to miss in production. Scale placement and artwork separately. Do not just shrink the garment and keep the same visual formula.
That matters even more on youth programs. The printable and embroiderable field tightens fast around the collar, sleeve, and side seam, so a mark that is technically centered can still feel visually heavy.
Women's fits, cropped fits, and oversized silhouettes
Shaped garments need placement based on the worn silhouette, not the flat spec. Women's fits often read better with the embroidery sitting slightly higher because the usable chest area shifts with taper, bust shaping, and narrower body length. Cropped styles compress the whole visual field, so a standard adult drop can make the logo feel sunken. Oversized tees create the opposite issue. The body gets bigger, but a small mark can feel disconnected and under-scaled unless the brand intends that restrained look.
Distinguishing cheap uniform branding from product-minded branding is a hallmark of experienced merch teams. The question is not only, “Will it fit?” The better question is, “Will it look placed on purpose?”
If you're trying to judge placement on shaped garments before sampling, resources on choosing your dress form can be surprisingly useful because they sharpen your eye for how structure, drape, and body shape alter visual balance in real wear.
For teams mixing decoration methods across different cuts, a comparison to custom shirt printing helps clarify the trade-off. Print can survive placements that embroidery cannot, especially on softer, tighter, or more elastic garments where stitched density adds bulk and visual weight.
Scale placement by proportions, silhouette, and the way the garment reads on body.
Pockets, curved fronts, and hard edges
Tricky zones punish lazy placement. Pockets, plackets, curved cap fronts, and areas near hardware all need clearance first and branding second. If the machine can technically sew the location but the garment loses function or the logo gets visually distorted, the placement failed.
Good production teams use a simple filter here:
If the surface bends, simplify the artwork and reduce detail.
If the area includes hardware or seams, leave enough clearance for clean sewing and clean viewing.
If the feature is functional, keep it functional after decoration.
If the background is busy or broken up, move the mark to a cleaner field.
A pocket that no longer works feels cheap. A logo wrapped awkwardly around a curved front panel feels cheaper. High-end embroidery looks calm, balanced, and deliberate, even on difficult garment shapes.
How Embroidery Type Changes the Rules
A logo can look disciplined on one garment and cheap on another, even with the same placement file. The difference is often the stitch method, not the coordinates.
Production teams get into trouble when they treat embroidery type as a finishing choice instead of a placement rule. Flat embroidery, 3D puff, chenille, and patch builds all change how a mark sits, how far it projects, and how much visual authority it carries. If the method has more body, texture, or edge weight, the placement has to absorb that change.
Flat embroidery
Flat embroidery gives the most control. It is usually the right call for left chest logos, sleeve hits, cuff details, and smaller marks that need to read clean instead of loud.
Because it stays close to the fabric, it tolerates tighter placement windows and finer internal detail. It also works better across modern premium cuts that are softer, cleaner, and less boxy than older placement charts assume. On polos, heavyweight tees, knit quarter-zips, and overshirts, flat embroidery usually delivers the sharpest result with the least visual drag.
If the brand signal is restraint, use flat embroidery.
3D puff embroidery
3D puff changes the balance immediately. The stitch height makes the logo look bigger than its measured dimensions, so placements that are technically centered can still feel crowded. That is why puff works best where the garment has structure and the design has breathing room.
Caps are the obvious fit, but not every cap front is equal. A high-profile structured crown can carry bold puff without distortion. A softer unstructured front often cannot. The same logic applies to outerwear. Puff can hold on a firm jacket chest or back yoke, but it tends to fight thin shells, drapey fleece, and any zone that folds hard during wear.
Artwork matters just as much. Clean block forms survive. Fine counters, small gaps, and delicate outlines usually collapse. If a team is weighing stitch texture against print for uniforms or event apparel, FLYP's expert advice on corporate apparel gives a solid outside view of where each method earns its place.
Chenille and patch-style embroidery
Chenille has presence. So do patch applications. Both read more like design features than discreet branding, which means the old default placements often feel undersized or timid.
These methods want space and a garment that can support visual weight. Full chest, oversized back placements, varsity-style zones, and heavyweight hoodies or jackets usually make sense. A tiny chenille hit on the left chest can work, but only if the rest of the garment styling is equally intentional. Otherwise it looks like the technique and the placement were chosen by different people.
Patch-style embroidery adds another trade-off. The border creates a hard edge, which can look premium on workwear, bags, and outerwear, but too stiff on lighter knit pieces. If the garment is soft and close to body, a patch can feel applied rather than integrated.
Some artwork clearly reads better in ink than in thread. Large filled shapes, distressed textures, and graphics that need openness often look cleaner on softer jersey garments like printed T-shirts for casual brand merch. Premium placement is not about forcing embroidery everywhere. It is about choosing the method that makes the brand look resolved.
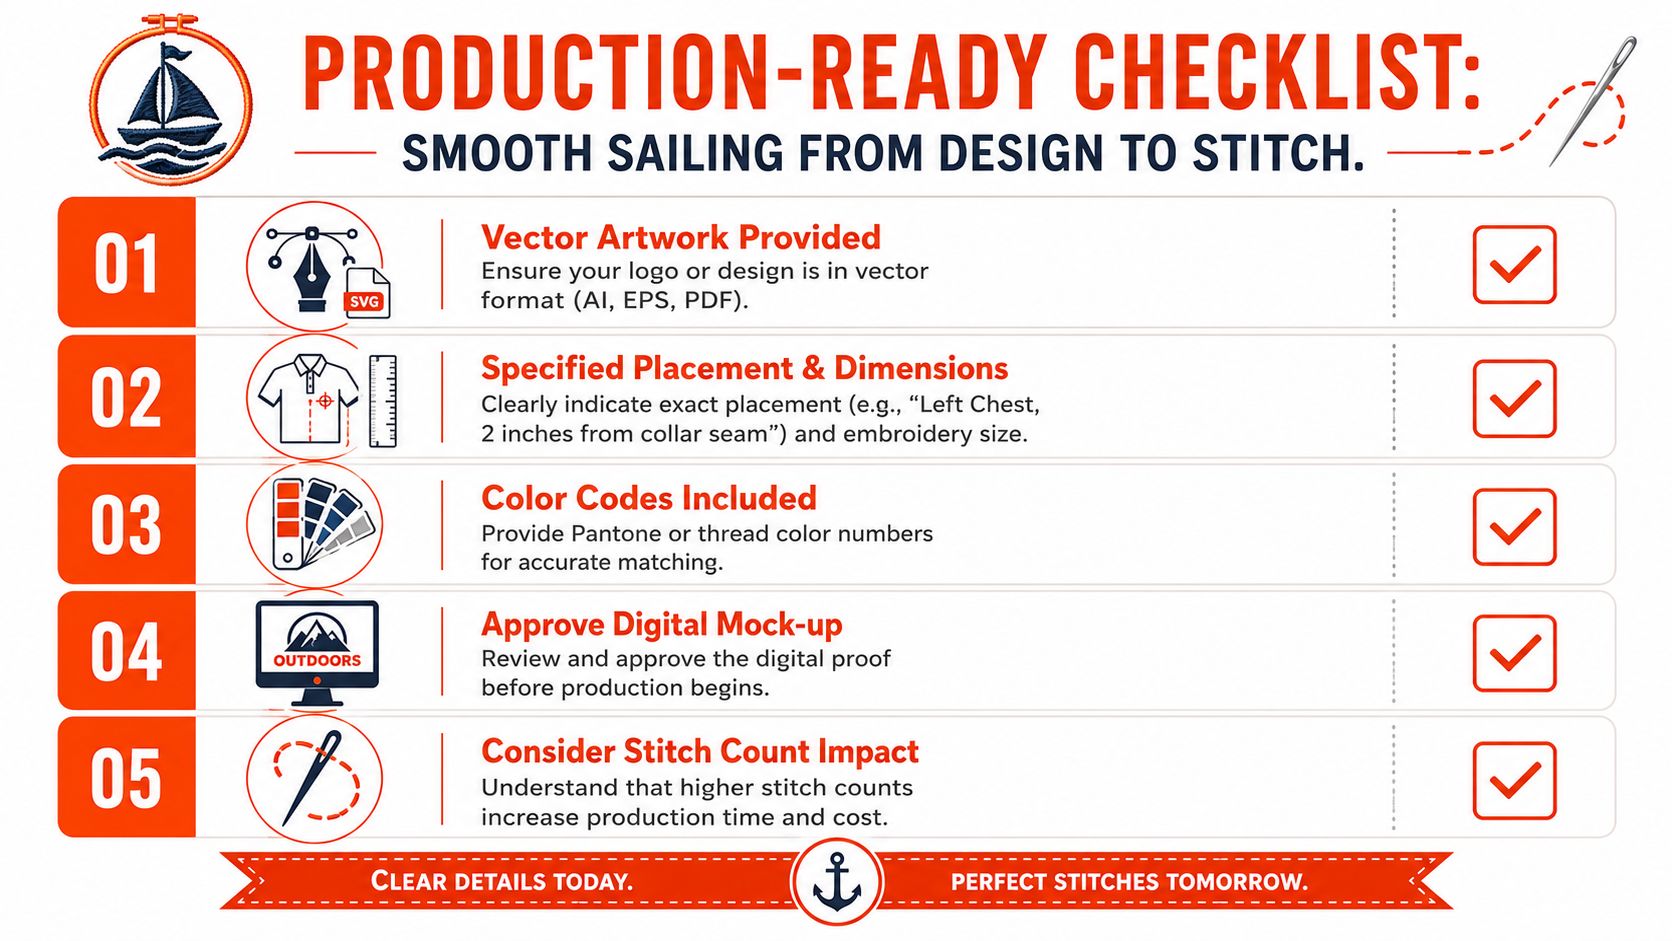
Prepping Your Files for Production
A premium blank can still come back looking cheap if the file package leaves room for interpretation.
Production teams do not work from taste. They work from instructions. If the brief says “left chest” without a measurement reference, one factory may place it near the armhole, another may center it more aggressively, and both will say they followed the spec. That is how expensive garments end up with embroidery that feels off by half an inch.
What a factory actually needs
The cleanest briefs anchor placement to physical points on the garment. Use center front, shoulder seam, placket edge, collar seam, pocket edge, zipper line, or high point shoulder. “Looks balanced” is subjective. “Logo center sits 3 inches down from HPS and 2.75 inches left of center front” is usable.
A strong production package usually includes:
Vector artwork in AI, EPS, or press-ready PDF
Thread color references with approved brand matches or named thread colors
Placement instructions tied to garment landmarks, not just a visual guess
Embroidery method specified up front, whether flat, 3D puff, chenille, or patch
Finished size of the embroidery area
Final mockup approval marked as the controlling reference
Method matters here more than many brand teams expect. A flat left-chest hit and a 3D puff left-chest hit do not occupy the garment the same way. Chenille needs more visual real estate. Patches introduce a border that changes the perceived size and edge tension. If the file only says “same placement as sample,” the result can drift fast.
A cleaner brief gets a cleaner result
A useful note looks like this:
Garment: heavyweight pullover hoodie
Artwork: primary wordmark, vector file attached
Method: flat embroidery
Placement: wearer's left chest, 3 inches down from high point shoulder, 2.5 inches from center front
Reference: approved mockup dated and signed off
Color: thread matched to brand palette
That level of detail saves approvals, resampling, and avoidable rework.
I also recommend adding one line about tolerance. If the placement can only drift by a quarter inch before it starts to look wrong, say that. On premium apparel, small misses read instantly, especially on cleaner silhouettes where the embroidery has less visual noise around it.
Clean embroidery starts long before the needle drops. It starts when the brief removes guesswork.
Better garments expose bad decisions. Fine pique, dense fleece, premium twill, and modern oversized cuts all make sloppy placement easier to spot. If the goal is merch that looks considered rather than promotional, the production file has to show the same level of control as the design.
Merch that looks considered from the blank choice to the final stitch is exactly what Banger is built for. We help internet-native teams produce embroidered apparel with fashion-grade quality, premium customization, and execution in France's best production ateliers, with a MOQ of 1 unit per item, 10 to 15 business days end to end, DDP shipping worldwide, and payment in USDC, USDT, or fiat. Browse the catalog and get a free, no-commitment quote with a product preview in 24 hours. Build embroidered merch your team will actually want to wear.