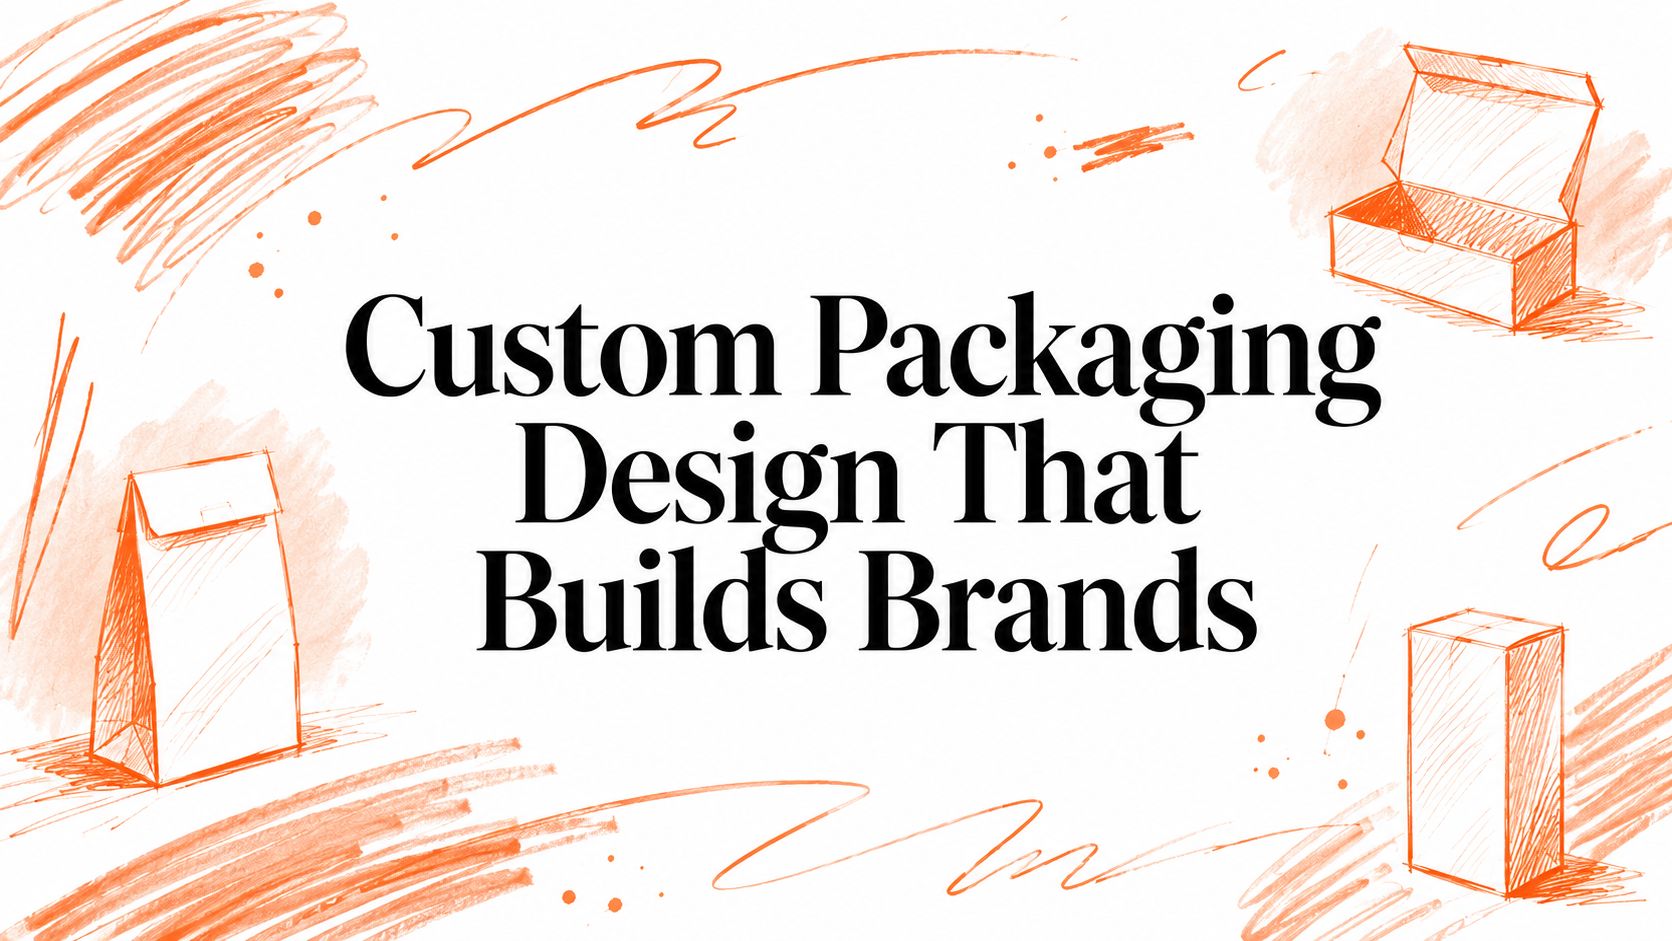
Custom Embroidery Services: Your 2026 Buyer's Guide
You're probably here because someone on your team said, "Let's do embroidered merch," and now you're staring at hoodie blanks, cap mockups, and a logo that looked fine on Figma but somehow feels wrong the second thread gets involved.
That tension is real. Embroidery can make branded apparel feel permanent, tactile, and expensive in the right way. It can also make a great identity look stiff, dated, and weirdly corporate if the garment, stitch style, and artwork aren't matched properly. Most guides stop at "embroidery is stitching on fabric." That's not the part buyers struggle with.
The key question, both simpler and harder, is this: when is embroidery the right move for your brand, and what separates premium execution from merch that feels like a conference freebie?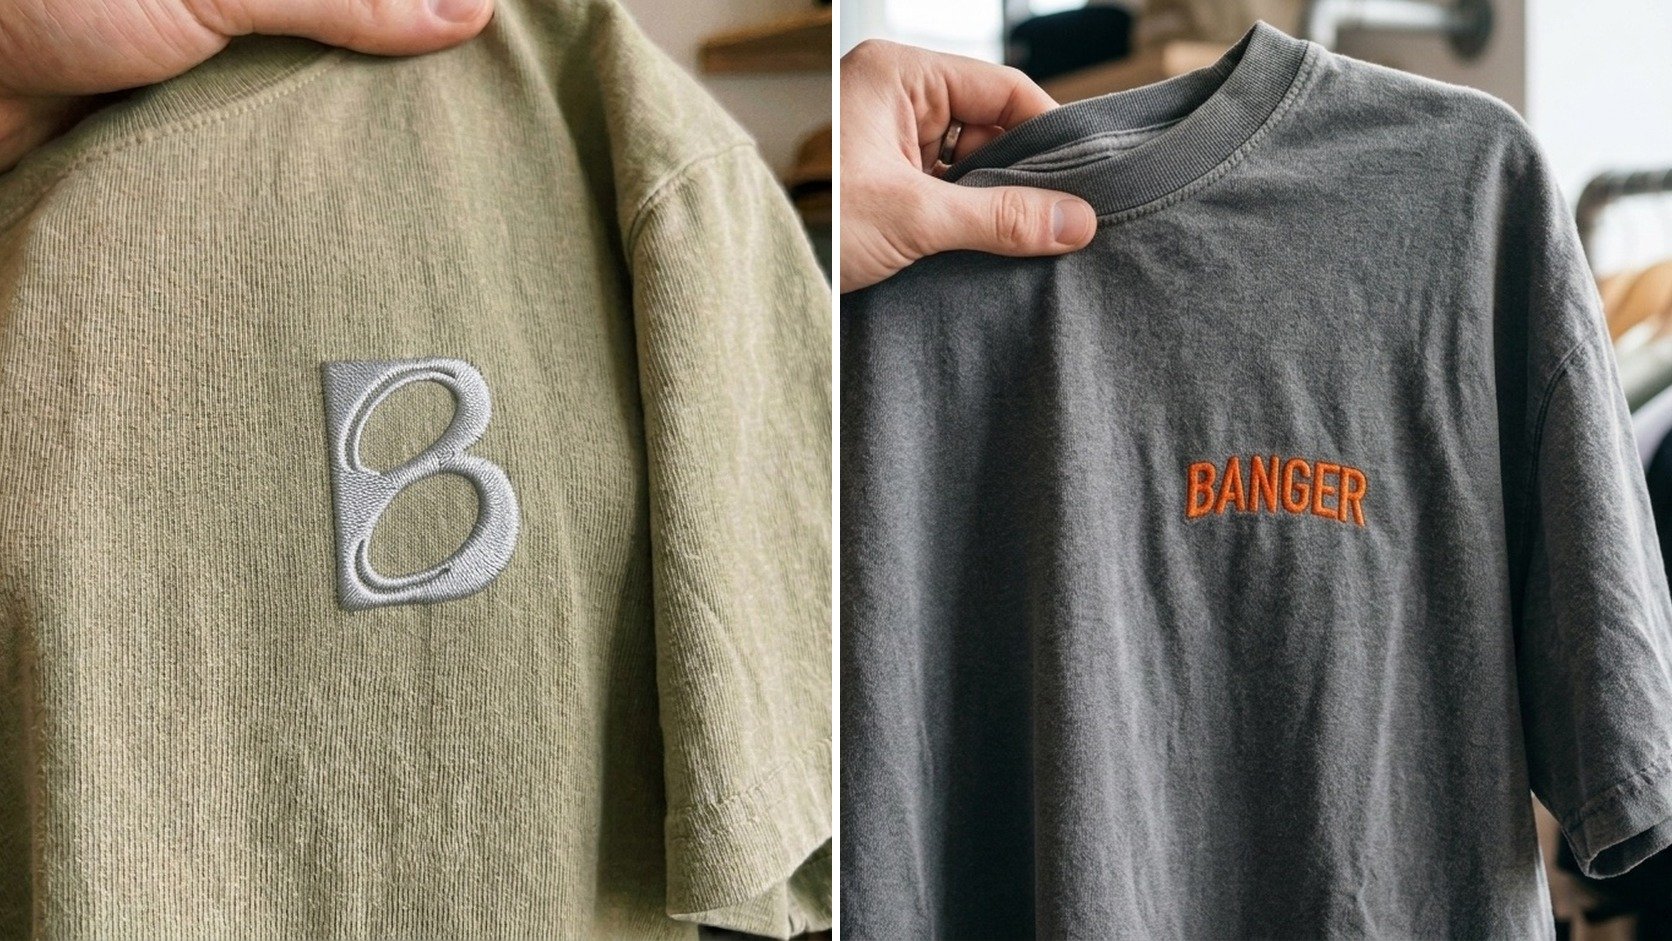
Here's a short preview of what we do in embroidery at Banger. On the left, a tonal grey B sitting high on the left chest of a washed olive heavyweight tee, low contrast on purpose so it reads premium up close. On the right, an orange BANGER wordmark on a washed grey tee, same left-chest placement, sized to stay clean against the garment. Garment, stitch style, and artwork matched so the logo feels like part of the piece, not stuck on top of it.
Table of Contents
Your Merch Deserves Better Than Dad-Cap Embroidery
Most embroidered merch fails in a very specific way. The logo is technically there, but everything around it feels off. The fabric is too flimsy. The stitch density is too aggressive. The placement is generic. The result looks less like branded apparel and more like a leftover box from a sales kickoff.
That's not because embroidery is outdated. It's because too many people treat it like a default instead of a design discipline.
The U.S. commercial embroidery services industry is estimated at 943 businesses and about $987.4 million in revenue in 2026, with revenue growing at 0.1% CAGR over the prior five years, according to IBISWorld's commercial embroidery services industry report. That tells you a lot. This is a mature, fragmented category. Anyone can offer embroidery. Very few make it feel current.
Most bad embroidery isn't ruined by thread. It's ruined by decisions made before production starts.
The difference shows up fast on hoodies. Put a compact chest mark on a dense, well-structured blank and it can feel like retail. Put that same file on a thin fleece with the wrong backing and the logo starts fighting the garment. If you're sourcing fleece or heavyweight pieces, this is exactly why blank selection matters as much as decoration. A guide to the best hoodie blanks for premium merch is often more useful than another generic embroidery explainer.
The better way to think about embroidery is this. It's not there to make a logo visible. Print can do that. Embroidery is there to add texture, restraint, and permanence. It works best when the brand already knows what it wants the garment to feel like.
How Custom Embroidery Actually Works
Embroidery looks simple from the outside because the machine gets all the attention. In practice, the important work happens before production starts.
A logo file from your designer isn't ready for stitching just because it looks crisp on screen. Thread behaves differently than pixels. It has direction, bulk, pull, tension, and physical limits. Good custom embroidery services know that the file has to be rebuilt for the medium, not just converted.
A quick process view helps:
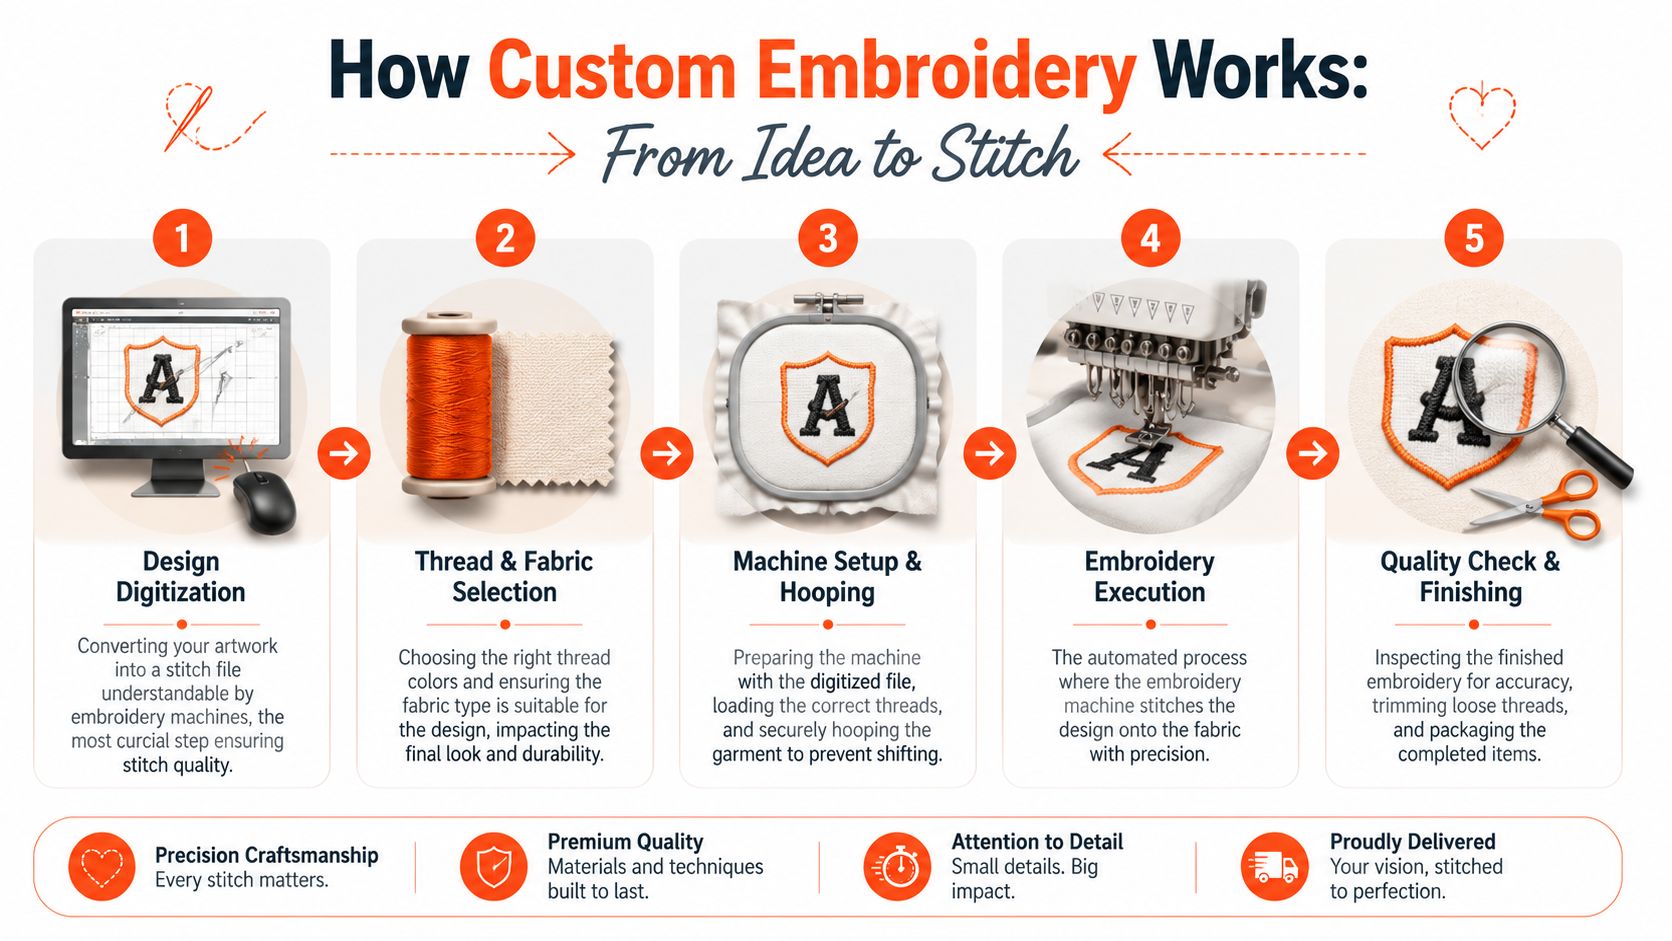
Digitizing is where quality starts
The critical step is digitizing. A technician maps artwork into a stitch file such as DST, PES, or EXP, then adjusts stitch type, density, tension, and pathing so the design runs cleanly on fabric. According to Maggie Frames' overview of commercial logo embroidery techniques, commercial machines commonly run at about 1,200 to 1,500 stitches per minute, so efficient digitizing affects both quality and throughput.
That speed is exactly why bad files fail fast. If the stitch sequence is clumsy, thread changes multiply, heads fall out of sync, and small errors turn into visible defects. Puckering, thread breaks, and muddy edges usually start here.
If you want a useful overview of how embroidery compares with other decoration methods, this breakdown of merch printing techniques gives good context on why embroidery has its own production logic.
Practical rule: If a vendor talks only about machines and never about digitizing, they're skipping the part that decides whether your logo will actually look good.
Later in the workflow, the garment gets hooped so the fabric stays stable, the correct thread colors are loaded, and the machine runs the stitch file across one or multiple heads. Then comes cleanup. Loose threads get trimmed, backing gets checked, and the finished piece gets inspected for alignment and consistency.
For a visual walk-through, this short video is useful:
Production is mechanical but the outcome is not
This is the part buyers often miss. Embroidery is repeatable, but it isn't neutral. The same logo stitched on a cap, polo, heavyweight hoodie, and nylon jacket will not behave the same way.
That's why premium execution usually comes from restraint. Simplify tiny details. Respect the garment's structure. Build the stitch file for the actual placement, not just the artboard. When teams ignore those basics, embroidery starts looking like an afterthought.
Flat 3D Puff and Chenille Techniques
Not all embroidery says the same thing. Technique changes the mood before anyone reads the logo.
A small flat chest hit feels clean and controlled. A raised puff mark on a cap feels louder and more streetwear-coded. Chenille feels nostalgic, almost collegiate, but only when the shape is simple enough to let the texture do the work. Choosing between them isn't just a production choice. It's an identity choice.
Flat embroidery for clean branding
Flat embroidery is the standard for a reason. It's the most flexible option for wordmarks, icons, monograms, and compact chest placements. It sits close to the garment, reads clearly, and usually looks best when the artwork has strong shapes and enough spacing between elements.
This is the move for polos, quarter-zips, overshirts, work jackets, and heavyweight hoodies where you want the brand to feel integrated instead of loud. Flat embroidery also handles finer text better than the more dimensional techniques, though “fine” in embroidery still needs judgment. Tiny legal copy and fragile linework usually don't survive the translation.
3D puff for shape and attitude
3D puff uses foam under the stitching to raise selected parts of the design. The effect is bolder, chunkier, and more graphic.
It works especially well on caps, structured snapbacks, and some hoodie graphics, where the garment already has enough body to support that height. For all its visual appeal, puff doesn't love intricate detail. Dense serif lettering, tiny counters, and fussy symbols can collapse into each other. Simpler forms win.
One smart use is selective contrast. Let one word or icon rise while the rest stays flat. That gives you depth without turning the whole piece into novelty merch.
Chenille for texture with a point of view
Chenille sits in a different lane. It uses looped yarn to create a fuzzy, tactile surface that feels closer to varsity patches than standard embroidery. It's perfect for big letters, simple shapes, and retro or sport-coded graphics on sweatshirts and jackets.
Chenille is not subtle. That's the point.
If flat embroidery is clean branding and puff is statement branding, chenille is identity branding. It works when the garment wants character, not polish.
What doesn't work is trying to force detailed logo systems into chenille. It's too textural for micro precision. Use it when scale is generous and the artwork can afford to be graphic.
The right technique should match both the garment and the brand voice. A fintech team drop, a creator capsule, and a campus-style community hoodie might all use embroidery, but they probably shouldn't use the same embroidery.
Embroidery vs Print A Decision Framework
The best answer to “should we embroider this?” is often “only part of it.”
Teams get stuck because they treat embroidery and print like competing upgrades. They're different tools. One gives you texture and permanence. The other gives you image freedom. The right choice depends less on budget than on what the garment needs to do.
A key filter is fabric compatibility. As French Press Custom's embroidery services page puts it, premium embroidery depends heavily on expert digitizing and pairing the design with the right textile. The same logo can look clean on a heavyweight garment and cheap on a lightweight performance fabric if the execution is wrong.
Here's the quick comparison:
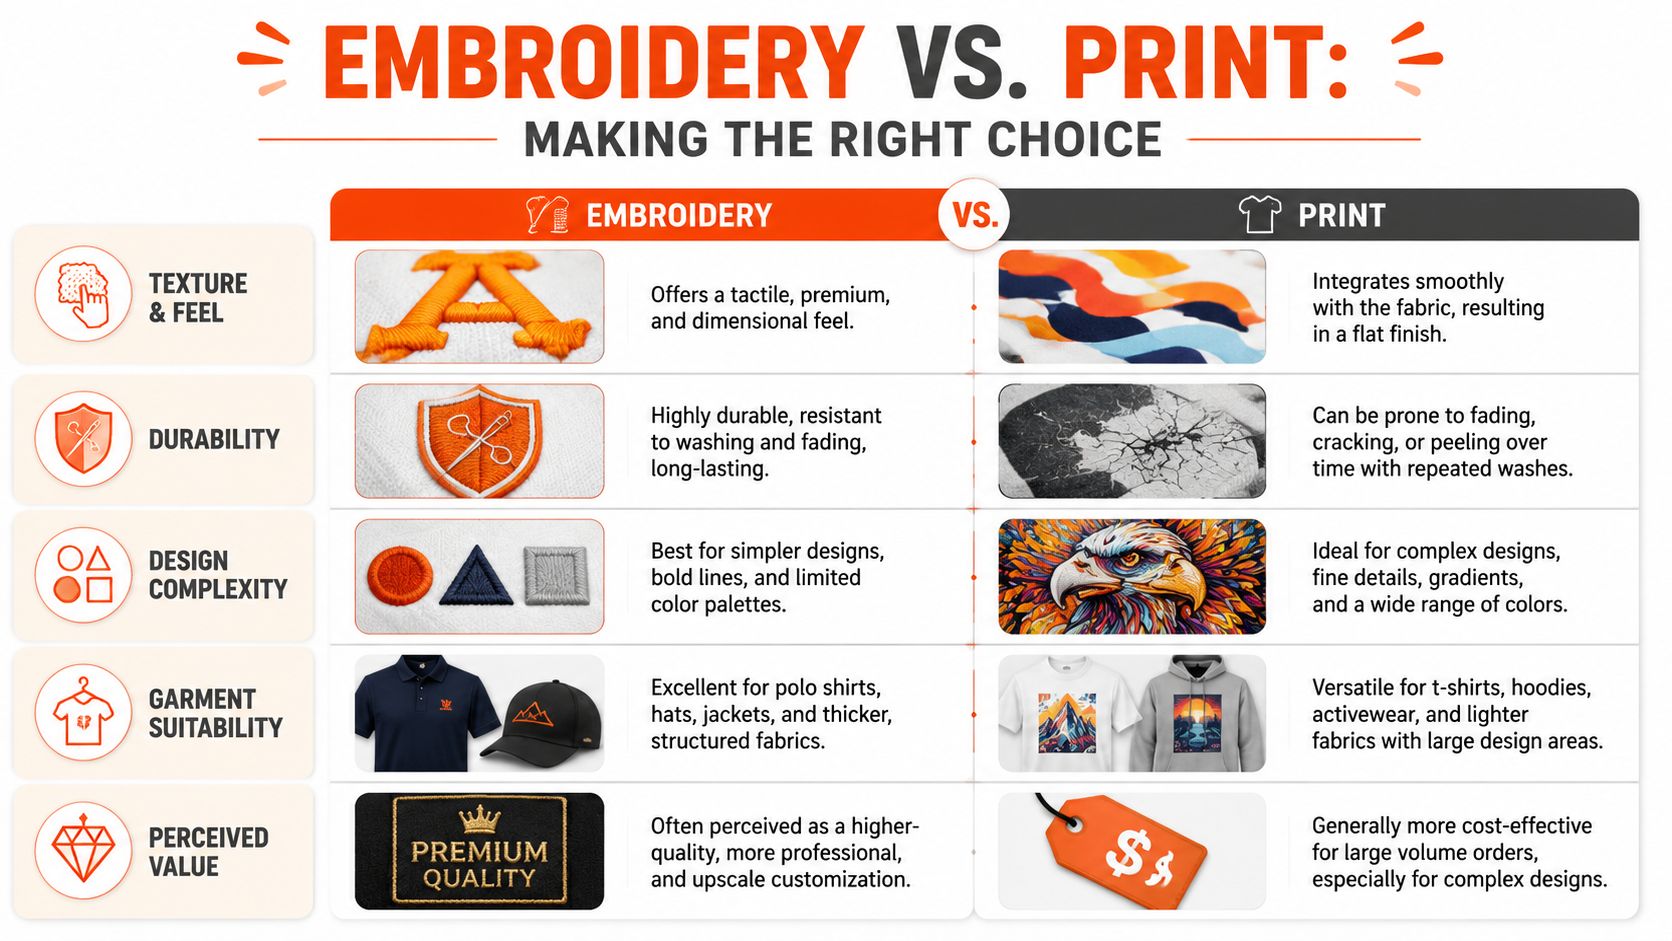
Choose embroidery when the garment can carry it
Embroidery works best when the base fabric has some structure. Think heavyweight hoodies, fleece, caps, beanies, workwear jackets, canvas totes, and polos with enough body to support stitches without warping.
Choose it when you want:
A tactile finish that feels closer to apparel branding than promotional decoration
Long-term durability for logos that will see repeated wear
A restrained design language with smaller placements and stronger shapes
A premium read on uniforms, team pieces, or event merch that needs to feel elevated
It's especially strong for left chest branding, sleeve hits, hat fronts, and understated placement systems.
Choose print when the artwork needs freedom
Print wins when the design is large, detailed, tonal, or image-led. It's the better route for back graphics, gradient work, photo treatments, distressed textures, and illustrations that need subtlety.
It also makes more sense on lightweight tees and technical fabrics that don't love dense stitching. If the artwork relies on tiny details or broad coverage, embroidery becomes restrictive fast. A guide to custom shirt printing methods is useful if your design lives in that world.
A simple way to decide is to ask what matters more: surface texture or visual detail. If texture matters more, embroidery probably fits. If visual complexity matters more, print usually wins.
Use both when the piece needs balance
The most considered merch often mixes methods. A heavyweight hoodie with an embroidered chest mark and a printed back graphic feels intentional because each decoration is doing a different job.
A few combinations that usually work:
| Garment | Better front treatment | Better back treatment |
|---|---|---|
| Heavyweight hoodie | Small embroidery | Large screen print |
| Structured cap | 3D puff or flat embroidery | Usually none |
| Work jacket | Flat embroidery | Optional patch or print depending on fabric |
| Lightweight tee |
Fashion-minded merch begins to differentiate itself from bulk giveaway logic. You don't need to embroider everything to make a piece feel premium. You need to use embroidery where it adds value.
Decoding Embroidery Pricing and Lead Times
Embroidery pricing feels mysterious until you know what shops are charging for. It's not just logo size. It's setup, stitch count, machine time, color changes, and how complicated the placement is on the garment.
The useful part is that most of those levers are visible before production starts. Good buyers use them to simplify the design without flattening the brand.
What actually drives embroidery cost
Industry guidance from Inkedjoy's custom embroidery pricing overview notes that a new design often carries a digitizing fee of $15 to $50, while stitch-based pricing can run around $0.50 to $3.00 per 1,000 stitches depending on complexity. The same source notes that standard garment embroidery is often capped at roughly a 4" x 4" area or about 15,000 stitches before a project moves into custom quoting.
That cap matters because it reflects how shops think. Standard chest logo territory is predictable. Once you go larger, denser, or more complicated, the job becomes less routine.
This infographic summarizes the levers cleanly:
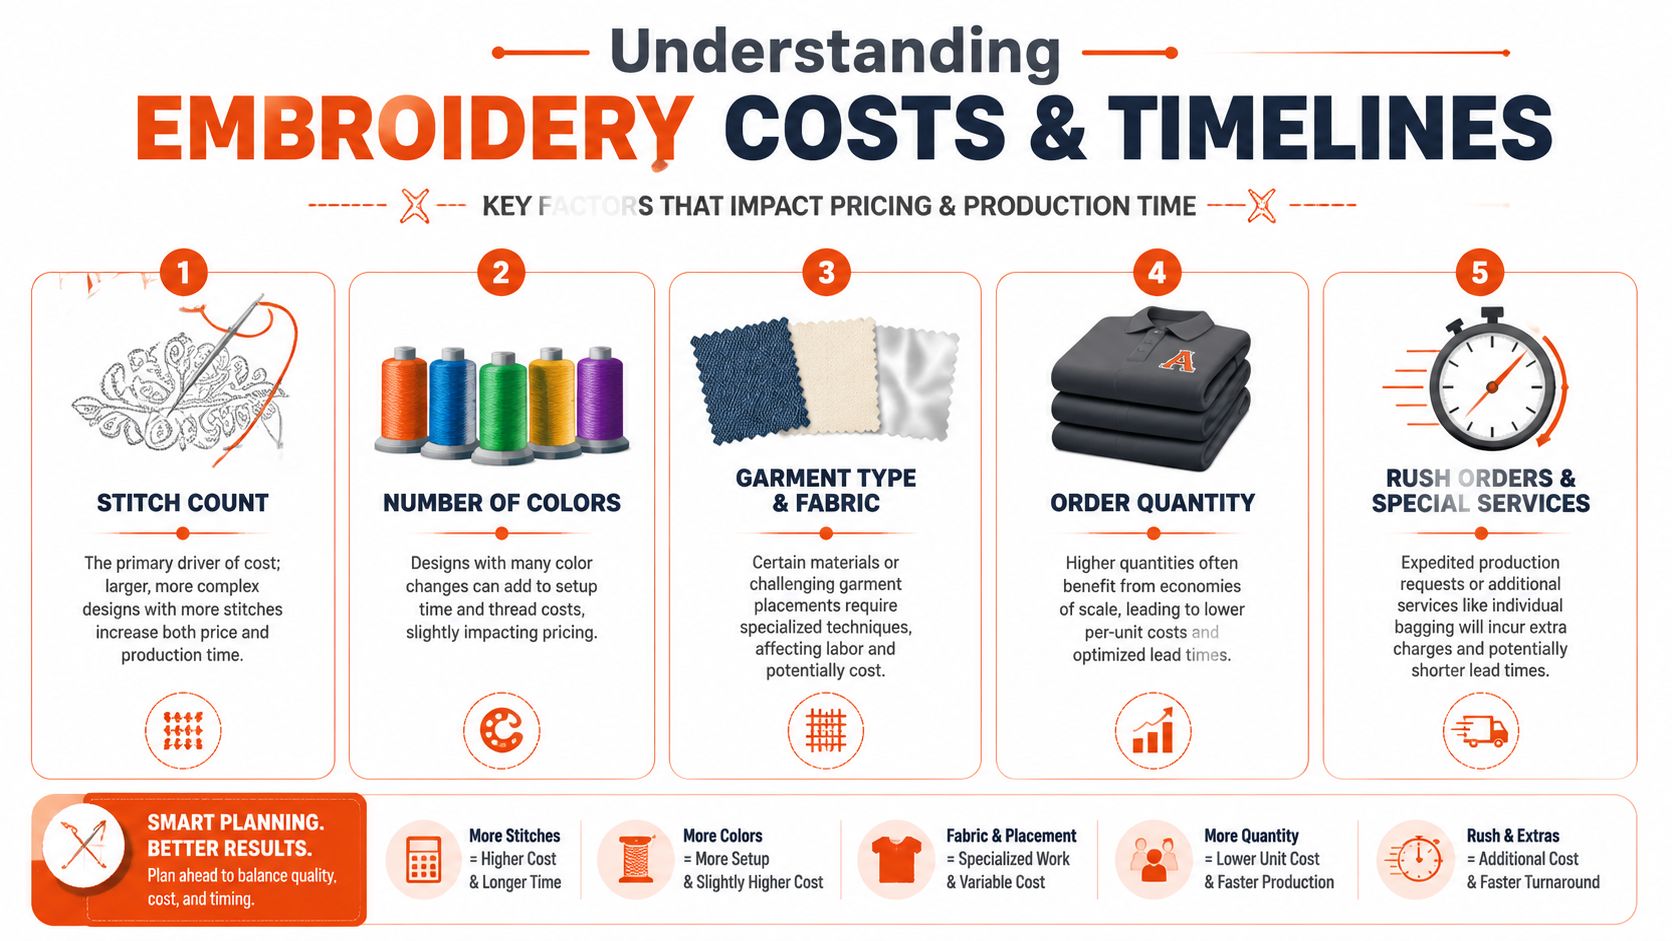
A practical benchmark from Apliiq's artwork prep guidance for embroidery is that many providers also flag designs with more than five colors for custom estimation because each added color increases thread changes and operator oversight.
How to keep a project efficient
If you want embroidery to stay premium without drifting into avoidable complexity, focus on a few decisions early:
Reduce unnecessary stitch count: Fill areas sparingly. Big solid embroidered blocks are usually where projects get expensive and heavy.
Limit color changes: A tighter palette often looks better anyway. It also reduces production friction.
Use embroidery where it matters most: Chest, sleeve, hat, or patch placements usually carry more value than oversized decoration.
Ask about proofing: A real proof catches problems before they become paid-for inventory.
Get clear on pricing logic: This FAQ on custom merch pricing is helpful if you want to compare embroidery with other customization methods.
Embroidery gets expensive fastest when a buyer tries to make thread behave like print.
Lead time depends on approvals, production scheduling, and shipping. The timeline usually feels smooth when the artwork is built for embroidery from the start. It slows down when the vendor has to rescue a design that was never meant to be stitched.
A Vendor Checklist for Premium Merch
A lot of embroidery vendors can technically run your job. Fewer can tell you when your idea should change.
That difference matters more than a cheap quote. The wrong partner says yes to everything, then sends a proof with a distorted logo and hopes you won't notice. The right partner pushes back on fabric, sizing, density, or placement before production starts.
Questions worth asking before you approve anything
Use this as a filter when you're evaluating custom embroidery services:

Who handles digitizing: If it's outsourced blindly or treated like admin work, quality gets inconsistent.
What blanks they recommend: Premium embroidery needs garments with the right structure. Generic catalog options aren't enough.
Whether they show relevant samples: Ask for embroidery on the same fabric category you're buying, not just a random cap or polo.
How they proof: Digital mockups help, but real-photo approvals are much better when placement and thread texture matter.
Whether they'll challenge bad ideas: You want judgment, not obedience.
How they score vendors internally: If your procurement team needs a framework, these effective vendor scorecards are a useful starting point for comparing quality, communication, and operational fit.
One overlooked signal is how a vendor talks about limitations. If they explain what won't stitch well, they probably know what will.
Operational fit matters as much as stitch quality
For modern teams, logistics can be a make-or-break factor. Cubby Hole's embroidery market discussion points out that buyers increasingly need support for low-MOQ, multi-address, and event-driven drops, while much of the traditional market still operates around local bulk ordering.
That's the difference between a shop that can decorate garments and a partner that can support distributed teams.
Ask directly about:
Low minimums: If you need a small internal drop, the vendor shouldn't force you into dead inventory.
Multi-address shipping: Remote teams, event speakers, and creator sends often need split fulfillment.
Event timing: Some vendors are good at evergreen reorders and bad at deadline-driven launches.
Post-production support: If they already handle merch fulfillment services, your life gets easier fast.
A premium embroidery partner should protect the brand, not just decorate the garment.
Custom Embroidery FAQs for Modern Teams
What file should you send
A vector logo is best. AI, EPS, or SVG gives the digitizer clean geometry to work from, especially if the design needs to be resized or simplified for stitching.
If all you have is a PNG or JPG, send the highest-quality version available. That may still be enough to rebuild the artwork properly, but the vendor will likely need to clean it up before digitizing. The key is legibility. Thin lines, tiny text, and soft gradients rarely survive embroidery unchanged.
Can embroidery work on heavyweight hoodies
Yes. In many cases, heavyweight hoodies are one of the best homes for embroidery.
Structured fleece and denser cotton give the stitching a stable base, which usually helps the logo sit cleaner and feel more intentional. That doesn't mean every hoodie design should be embroidered. Large fills can still get heavy, and some oversized graphics are better printed. But if you want a small chest mark, sleeve hit, or understated brand detail, heavyweight hoodies tend to support that look well.
Is embroidery a sustainable customization method
It can be, but sustainability doesn't come from the stitch method alone. It comes from the full product decision.
The garment matters. The thread matters. The likelihood that people will keep wearing the piece matters most. A well-made embroidered hoodie that stays in rotation is a better outcome than a cheaper item that gets worn once and forgotten.
If sustainability is part of the brief, ask about thread materials, fabric sourcing, and whether the vendor can guide you toward blanks built for longer wear. Embroidery usually makes the most sense when it's attached to a garment worth keeping.
If you're building custom merch and want embroidery that feels like real apparel instead of default office swag, Banger is built for that. We help internet-native teams produce premium pieces with a MOQ of 1 unit per item, strong garment options, 10 to 15 business days end to end, DDP shipping worldwide, and payment in USDC, USDT, or fiat. Browse the catalog and get a free, no-commitment quote with a product preview in 24 hours. Build embroidered merch your team will actually want to wear.