Pad Printing Services: The Definitive Guide for 2026
You're probably here because a normal print method just failed your idea.
The logo looked great on the mockup. Then the physical product arrived. A curved metal bottle. A rubberized power bank. A glossy case. A cap side panel. A tiny branding hit on something with distinct shape, texture, and attitude. Suddenly the usual options stop being useful, and the vendor starts steering you toward whatever their machine can handle instead of what your brand truly needs.
That's where pad printing services get interesting. Not as an industrial footnote, but as one of the few decoration methods that can put crisp branding onto objects that refuse to behave like a flat tee. If you're building merch with any taste at all, that matters. The best drops aren't just a logo on cotton. They're the details on the objects people keep on their desk, carry daily, or notice up close.
Most merch guides stay stuck in promo-land. Pens, stress balls, plastic trinkets. That misses the essential question premium brands care about. Not just can this be printed, but will it still feel intentional, premium, and worth keeping once the sample is in your hand.
Table of Contents
The Merch Problem You Did Not Know You Had
Many organizations don't realize they have a decoration problem until they try to make merch that feels a little more special than a standard chest print.
A founder wants branded over-ear headphones for a launch event. A marketing team wants a clean mark on a matte travel mug, not a giant wraparound graphic. A community lead wants a subtle logo on the side of a heavyweight cap, or a small branded hit on a hard case inside an onboarding kit. The concept is easy. Production is where it gets messy.
Flat printing methods are great when the product behaves. A tee behaves. A poster behaves. A tote usually behaves. But the minute the surface curves, dips, tapers, or shrinks, you stop designing in a vacuum and start negotiating with physics.
That's why a lot of merch ends up getting dumbed down. Instead of making the item feel premium, the production method forces the idea into something flatter, bigger, louder, and less refined. The mark gets oversized to survive the process. The placement moves because the machinery needs it. The finish starts looking like a compromise.
Premium merch usually falls apart at the edge cases. Small placement. Tight radius. Tricky substrate. That's where quality gets decided.
Pad printing is one of the few methods that solves that problem cleanly. It's built for branding objects with dimensional surfaces, especially the ones that matter in a modern merch program. Think drinkware details, tech accessories, molded packaging components, product add-ons, and hard-to-decorate trims.
If you're still shaping the broader concept, it helps to start with a stronger merch system, not just a list of products. Banger's guide on how to create merchandise is a useful reference for that bigger-picture planning.
How Pad Printing Actually Works
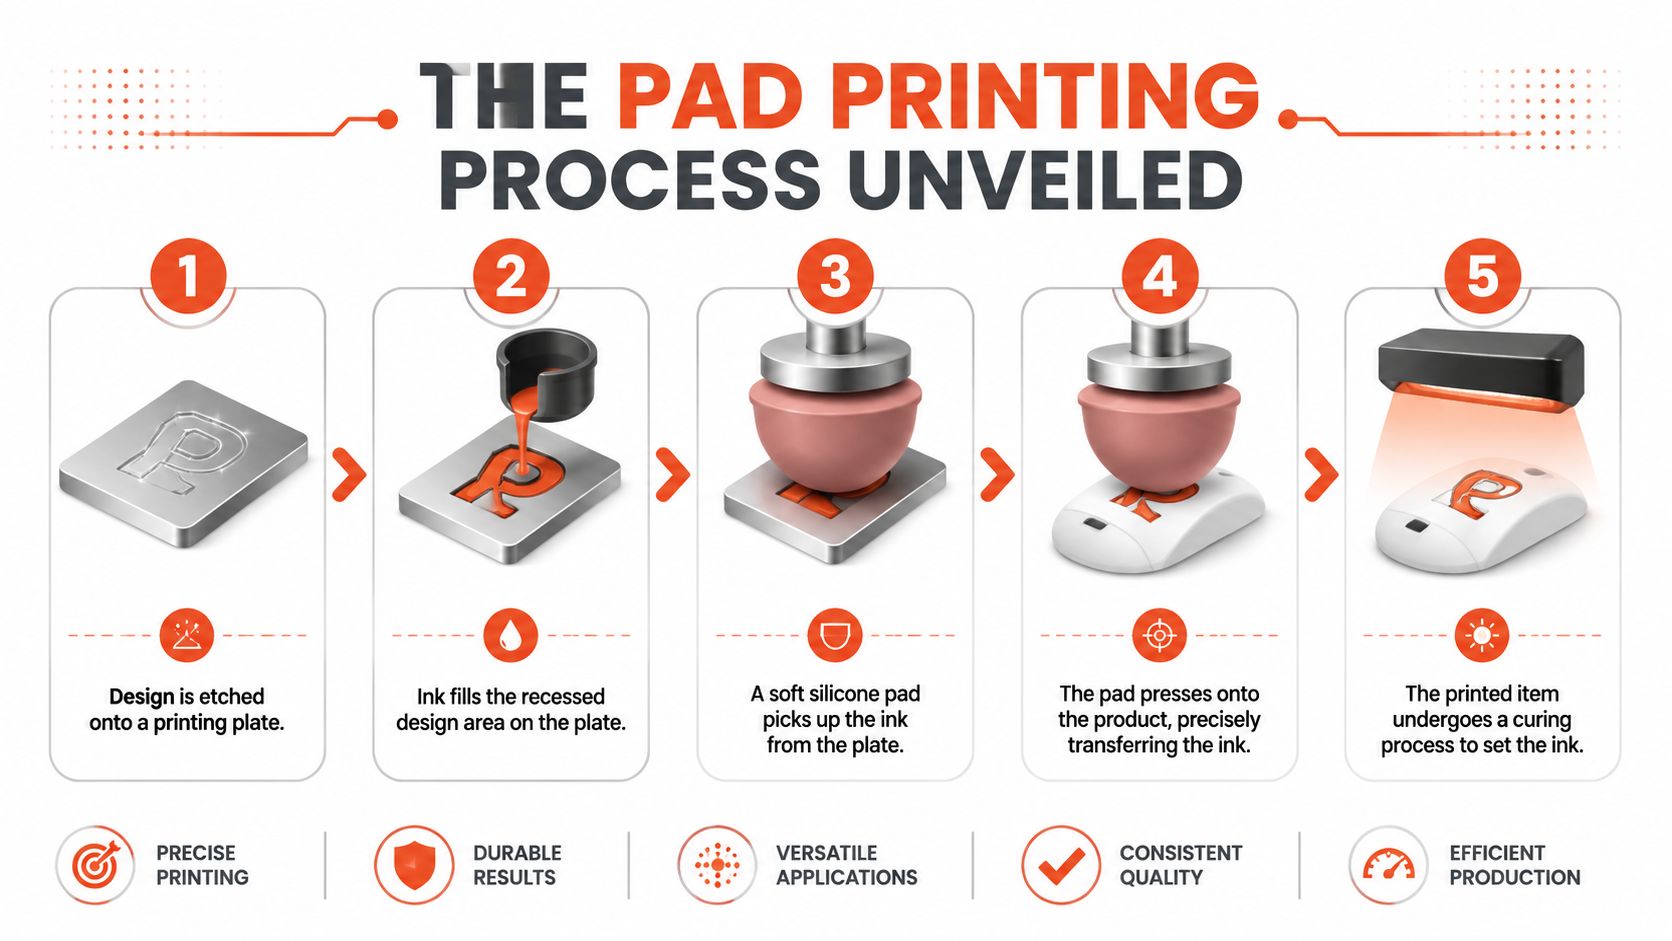
Pad printing is basically a precision transfer process. A design gets etched into a plate, ink fills that etched area, and a soft silicone pad picks up the image and presses it onto the product.
The important part is the pad. According to Fictiv's explanation of the pad printing process and applications, the core mechanism of pad printing involves a silicone transfer pad with low durometer (hardness) that compresses onto an ink-filled etched plate to pick up the 2-D image, then slides to compress onto the 3-D substrate, enabling high-detail reproduction on concave, convex, and textured areas where screen printing fails.
The simplest way to think about it
It's akin to a high-precision rubber stamp, except much smarter and much more adaptable.
A normal stamp works best on a flat sheet. Pad printing works because the silicone pad can deform just enough to meet the shape of the product without destroying the design. That's the trick. It carries a flat image, then lands it onto something curved or irregular with surprising control.
If you want a broader read on how different decoration methods stack up, Banger's overview of merch printing techniques gives helpful context without the usual trade-show jargon.
What each part is doing
Three components matter most.
- The cliché plate holds the artwork in etched form. Precision begins here. If the plate is sloppy, the print is sloppy.
- The silicone pad lifts the ink from the plate and transfers it to the object. Its softness and shape affect how well it can wrap around curves and small details.
- The ink system needs to match the substrate. Plastics, metals, glass, and coated surfaces all behave differently, so ink choice isn't cosmetic. It's performance.
From there, the process is simple in concept and unforgiving in practice:
- Artwork gets translated to the plate. Fine details need to survive this step cleanly.
- Ink fills the etched image. Excess ink gets cleared away so only the intended design remains.
- The pad picks up the image. This has to happen cleanly, without distortion or partial pickup.
- The pad presses onto the item. That's where shape, pressure, and alignment all matter.
- The print cures. If curing is wrong, even a beautiful print can fail later.
Practical rule: Pad printing looks easy only when the setup is excellent.
That's why good vendors obsess over fixture design, pad shape, substrate prep, and curing conditions. Buyers usually only see the logo. The print team sees tolerances, pressure, timing, adhesion, and repeatability.
When You Should Use Pad Printing
Pad printing makes sense when the object is the hero and the branding needs restraint.
A lot of premium merch lives in that zone. Not loud. Not oversized. Just placed exactly where it should be, with enough crispness to look considered. That's why pad printing keeps showing up on the kinds of products people use every day.
Where it shines
Use it when you need fine branding on surfaces that aren't flat or friendly.
A few strong use cases:
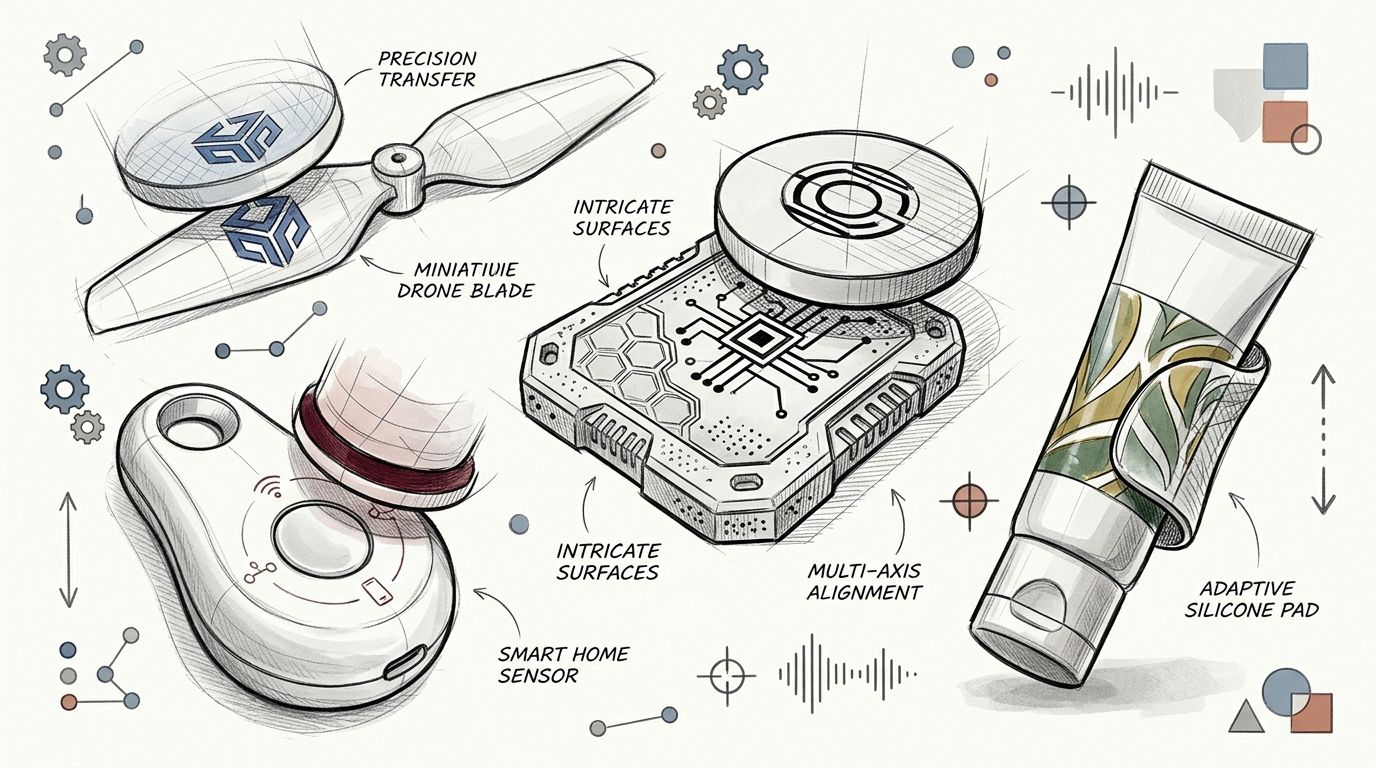
- Tech accessories: Earbud cases, wireless chargers, power banks, mice, webcam covers, and molded device shells.
- Drinkware details: Small marks on insulated mugs, bottle caps, lid components, or curved ceramic pieces.
- Leather and coated accessories: Wallet inserts, branded tags, small cases, or structured items where embroidery or screen printing would feel wrong.
- Caps and trim zones: Side placements, buckle-adjacent marks, molded closures, or branded hardware.
- Packaging components: Hard presentation boxes, trays, custom inserts, and gift set elements that need subtle identity, not billboard graphics.
Pad printing also handles more than decorative branding. Printing International notes in its overview of what pad printing can transfer that the process can apply conductive inks, adhesives, flavors, nutritional additives, natural dyes, and lubricants, alongside solvent-based, UV-curable, or two-component inks, with primers used for difficult substrates.
That flexibility explains why it shows up in industrial and branded product contexts alike. The same core process can handle aesthetic work and functional marking.
A useful production clip sits below if you want to see the transfer behavior in motion.
The soft goods question nobody answers well
Most content gets weak at this point.
Pad printing is well understood on rigid materials like plastic, metal, and glass. Soft apparel is a different conversation. A heavyweight hoodie, especially in the 400-500 GSM range, doesn't behave like a molded shell. It moves, flexes, folds, and gets washed.
That's exactly why brands hesitate. A 2024 industry report found that 68% of textile clients reject pad printing for apparel due to uncertainty about crack resistance after 50+ wash cycles in Boston Industrial Solutions' discussion of pad printing for textiles and related applications.
The issue isn't whether a logo can be applied. The issue is whether it still looks intentional after real wear.
So where does pad printing belong on apparel? Usually in selective, high-control applications. Small detail hits. Trim zones. Structured areas. Components with less stretch. It's rarely the first choice for a large front graphic on a soft fleece body. That's where people get into trouble.
For premium soft goods, the smart move is to treat pad printing as a specialty tool, not a default apparel solution. Used that way, it can add a level of precision that other methods can't reach.
Pad Printing Versus Other Customization Methods
The mistake isn't picking the wrong print shop. It's picking the wrong process for the object.
Every decoration method has a lane. Good production teams know that. Bad ones try to force every project through the same machine and call the limitations “industry standard.”
The right tool for the right object
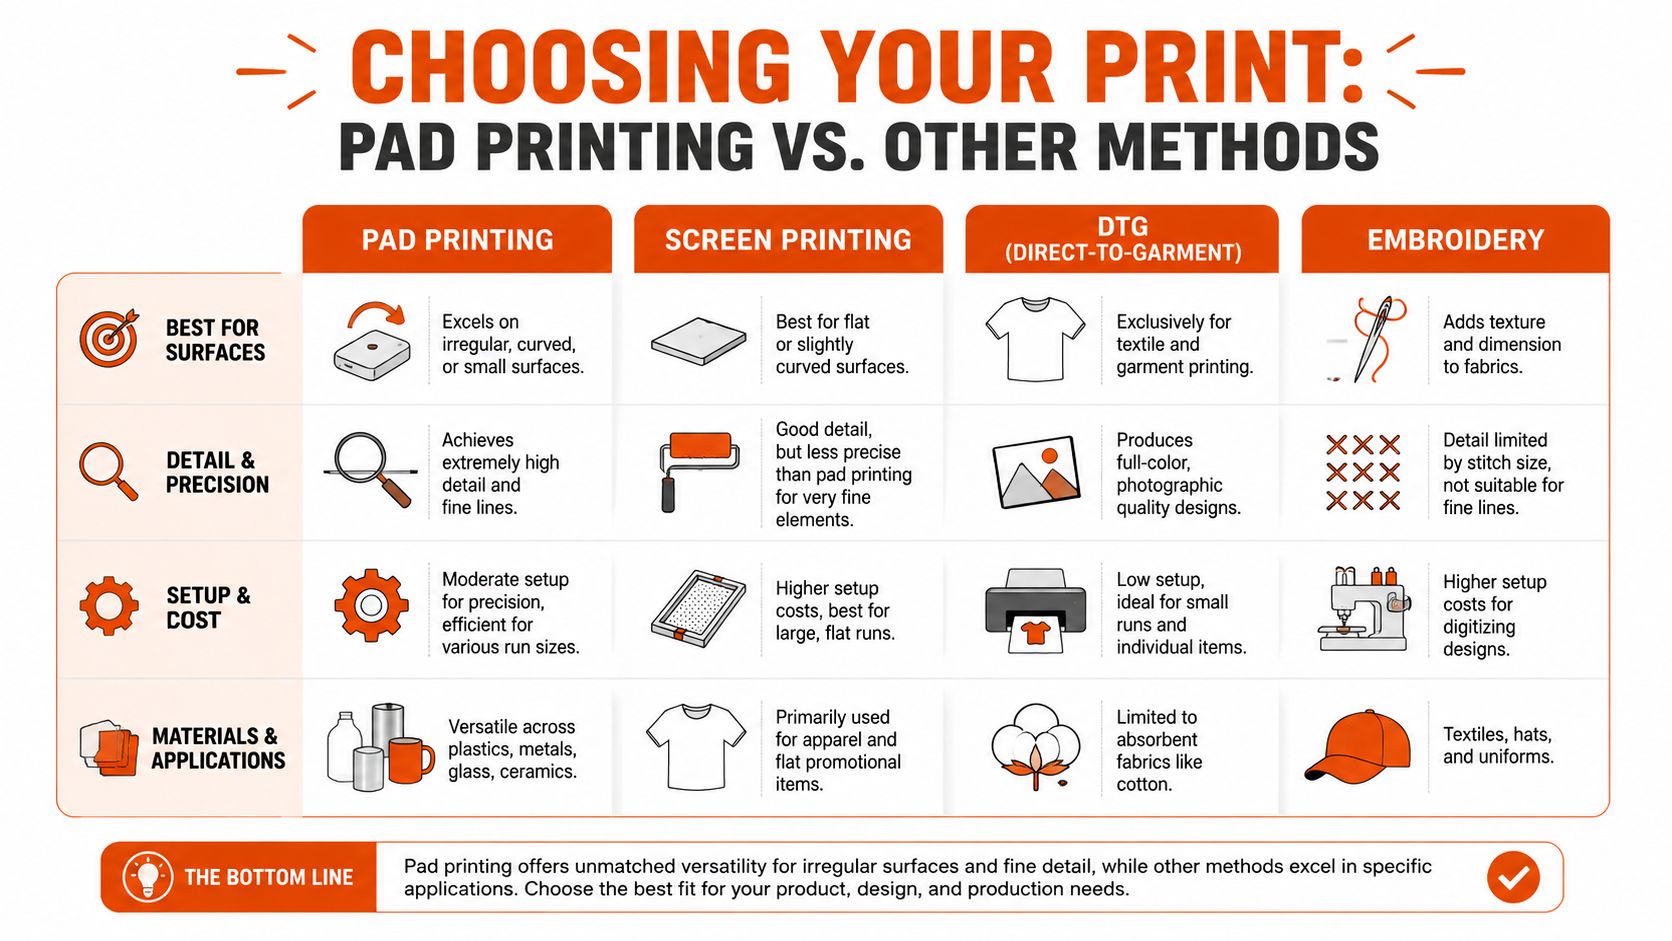
Pad printing wins when the object is small, shaped, curved, or awkward. If your logo needs to sit cleanly on a molded surface, this is usually the first serious option.
Screen printing is still the workhorse for flat apparel and larger simple graphics. It gives strong coverage and holds up well when the print area is broad and the surface is cooperative. But once the form gets more dimensional, screen printing runs out of road.
DTG is about image complexity, not object complexity. It's useful when you need photographic or full-color artwork on garments, especially cotton-based pieces. It's not the answer for a ceramic mug lid, a plastic charging case, or a metal tool body.
Embroidery adds texture and status, but it also changes the feel of the product. That can be a feature or a problem. If you need subtlety, micro-detail, or branding on a hard surface, thread won't help you.
For broader apparel context, Banger's guide to custom shirt printing is a good companion read, especially if you're deciding between garment-first methods and object-first methods.
Quick comparison table
| Method | Best for | Struggles with | Visual result | Best use case |
|---|---|---|---|---|
| Pad printing | Curved, irregular, small, or molded surfaces | Large print areas, stretch-heavy soft goods | Crisp, controlled, precise | Tech accessories, drinkware details, hard goods, small placements |
| Screen printing | Flat surfaces and bigger graphics | Tight curves, highly dimensional objects | Bold and solid | Tees, totes, flat panels, simple large-run graphics |
| DTG | Full-color garment prints | Non-textile surfaces, hard goods | Detailed and image-driven | Art-heavy cotton apparel runs |
| Embroidery | Textiles that benefit from texture | Fine micro-lines, hard surfaces, tiny copy | Raised, tactile, premium | Caps, polos, outerwear, classic uniform-style branding |
A few blunt rules help.
- If the object has geometry, start with pad printing.
- If the artwork is big and the surface is flat, screen printing is simpler.
- If the artwork needs gradients or photographic detail on apparel, look at DTG.
- If the logo should feel stitched, substantial, or heritage-coded, use embroidery.
Pad printing also carries serious production capacity. Deco Technology's overview of industries served by pad printing states that it supports production speeds exceeding 20 parts per minute (1,200 parts/hour) and can reach up to 9,000 cycles per hour for lower-complexity applications, with use across automotive, medical device, and cosmetic packaging sectors.
That speed matters less to a design team than to your ops lead. But it explains why pad printing stays relevant. It's not just precise. It scales.
A premium result isn't about choosing the fanciest method. It's about choosing the method that doesn't fight the object.
Nailing Your Design and Quality Control
Most bad pad printing starts before production. The issue isn't the machine. It's the file, the placement logic, or the fact that nobody asked whether the surface could support the design in the first place.
Premium results come from restraint. Better files, tighter placement, fewer unnecessary details, and a stronger sense of what the object wants.
What to fix before production starts
Start with vector artwork. Not a screenshot, not a flattened web export, not a logo pulled from a slide deck. Pad printing is a precision process, and fuzzy source files turn into soft edges fast.
Resolution matters on the production side too. Industrial pad printing requires a minimum resolution of 32 dots per centimeter, with 40 to 42 dots per centimeter being optimal for sharp, accurate registration, according to this technical video reference on pad printing resolution. The same source notes that this supports high-quality prints on components ranging from 30mm to 170mm.
That tells you something important. Fine detail is possible, but only when the artwork is built for it.
A few design rules make life easier:
- Reduce micro-elements: Tiny legal text, hairline strokes, and ultra-fine negative space often look smarter on screen than in production.
- Respect the object's shape: A straight logo on a curved item can feel visually off even if the print is technically correct.
- Choose color intentionally: Spot colors work best when the brand system is disciplined.
- Design for placement, not just scale: A small mark in the right place feels premium. A larger one in the wrong place feels promotional.

What premium quality looks like in hand
You can spot a weak sample in seconds if you know what to check.
Look for these signals:
- Edge definition: The logo should look clean, not fuzzy or swollen.
- Opacity: The ink should feel intentional, not washed out or patchy.
- Registration: If there are multiple colors, they should align properly.
- Adhesion: The print shouldn't look like it's sitting nervously on the surface.
- Placement consistency: On a run of products, the mark should land in the same place every time.
For regulated applications, process control gets even stricter. EngyPrint's overview of compliance in medical device pad printing notes the use of ISO 13485 quality management requirements for medical devices, along with substrate-specific ink selection, material compatibility, and regulatory marking needs such as serial numbers, expiration dates, and symbols.
You may not be printing medical components, but the lesson still applies. The best suppliers think in systems. Surface compatibility, ink selection, curing, and inspection are all part of the visual result.
If a supplier can't explain why a sample looks good, they probably can't repeat it reliably.
Understanding Pad Printing Costs and Timelines
Pad printing quotes confuse people because the cost doesn't live in one place.
You're paying for setup, tooling, ink choices, sampling, alignment, substrate behavior, and the actual print run. The unit price on its own doesn't tell the story. A cheap quote can hide weak prep, loose quality control, or a process mismatch that shows up later as rework.
What actually drives the quote
The first variable is setup. Pad printing needs a plate, and that means artwork has to be translated into something physical and production-ready. If you add colors, you add complexity, because each color usually needs its own pass and tighter registration control.
The substrate changes things too. A straightforward plastic shell is one conversation. A coated metal surface, textured rubber, or specialty finish is another. Some materials need primers or specific ink systems to bond well, and that affects both production planning and price logic.
Volume matters, but not in a simplistic way. The global pad printing market is projected to grow from $1.25 billion in 2024 to $1.87 billion by 2033 at a 4.8% CAGR, according to Verified Market Reports on pad printing services. That same source frames the process as a cost-effective solution for businesses of all sizes, which tracks with what buyers see in practice. Once setup is handled, pad printing can be efficient across a wide range of order profiles.
A quote usually gets cleaner when you provide:
- Final artwork early
- Exact material specs
- Clear print location visuals
- Realistic color expectations
- Accurate quantities by SKU
If you want to understand how long quote stages and approvals usually take on custom merch projects, Banger's FAQ on custom merch quote timing is a practical reference.
Where timelines usually slip
Production delays rarely come from the print stroke itself. They come from indecision.
Late file changes. Unclear Pantone calls. Surprise substrate swaps. A sample gets approved on one finish, then the final product arrives with another. Those are true timeline killers.
The buyers who move fastest usually do one thing well. They lock the object, then lock the artwork, then leave the process alone.
How to Order Like a Pro and Choose a Partner
A lot of production problems can be avoided by asking better questions upfront.
You don't need to become a print technician. You just need enough fluency to spot when a supplier is thinking carefully versus when they're just saying yes to win the job.
Questions worth asking before you approve anything
Ask practical things, not vague things.
- What substrates have you printed this design on before? Similar matters more than impressive.
- Which ink system are you recommending, and why? If they can't explain compatibility, that's a warning.
- Will this placement distort on the object's curve or texture? Good suppliers answer directly.
- What does your approval sample show besides artwork? You want placement, opacity, and finish, not just a logo presence check.
- How do you handle adhesion testing and curing validation? This matters more than polished sales language.
- What's the failure point for this design? Strong partners know where things can go wrong.
If you want a good example of a product ordering flow that forces clarity early, the Custom Bass Drum Head design process is worth a look. It's a different category, but the logic is solid. Lock the specs, confirm the artwork, align on production details, then move.
The best vendors don't promise everything. They narrow the brief until the result is repeatable.
When a full-service partner makes more sense
If you're ordering one specialized item and already know the substrate, artwork, and print method, a direct supplier can work.
If you're building a real merch program, things get more complicated fast. Multiple SKUs. Different decoration methods. Apparel mixed with hard goods. Event kits. Fulfillment. Global shipping. At that point, the print method is only one variable in a bigger production system.
That's when it helps to work with a partner who can manage sourcing, decoration choices, approvals, and logistics together. Especially if your drop includes both soft goods and object-based merch, because those production conversations are completely different.
For teams planning shipping after production, Banger's guide to merch fulfillment services is a useful next read.
If you're building custom merch that needs to look premium in real life, not just in a mockup, Banger can help. Explore the catalog, request a quote, and get product previews within 24h. Build merch your team wants to wear.